• AutoCAD LT
  • AutoCAD LT for Mac

AutoCAD LT User interface

Customize the user interface to accommodate your workflow.


The user interface provides all the tools you need to work on a drawing. Increase productivity and simplify your workflow by customizing the interface to support the way you work.


Tour the AutoCAD LT UI

View a demo of the basic tools in the user interface.

Learn how to perform these useful functions:

  • Begin a new drawing
  • Create and modify objects
  • Use the ribbon and Quick Access toolbar
  • Start a command
  • Customize your workspace

00:06

after startup, you'll see the start tap

00:09

here.

00:09

You can use the start drawing button to begin a new

00:12

drawing or start a drawing from a variety of templates.

00:17

You can also open a drawing from the recent documents list

00:24

In the notifications area.

00:26

You'll receive product update information when it's available and in connect you

00:30

can sign in to your a 360 account or send us feedback.

00:37

The drawing area is where you create and modify objects to represent your design.

00:44

The navigation bar provides access to the steering wheel

00:47

pan

00:47

and zoom.

00:50

Use the menu button in the lower right corner to customize the navigation bar.

00:57

In the lower left corner of the drawing area is the UCS icon,

01:00

which displays the positive directions of the X and Y.

01:03

Axis.

01:06

When you hover over a drawing file tab,

01:08

you'll see preview images of the model and layouts.

01:15

Right click on any drawing file, tap for additional options

01:20

above the file tab is the ribbon.

01:23

The ribbon organizes commands and tools into tabs and panels.

01:28

For example,

01:29

the draw panel on the home tab contains tools to create objects such as lines,

01:34

circles and ellipses.

01:35

While the modify panel contains tools to modify objects such as move,

01:40

copy and rotate

01:44

the quick access toolbar displays frequently used tools,

01:48

you can easily customize this to include the tools you like to use,

01:52

click the application button to create, open or published drawings

01:57

or to search for commands

02:02

in the lower left corner of the drawing

02:04

area are the controls to switch between model space

02:07

where you'll do most of your drawing

02:09

and paper space.

02:10

the layout tabs that allow you to control which area

02:12

of the drawing to publish and at which scale.

02:16

You can add more layouts by clicking on the plus sign.

02:21

Use the command line to start a command and provide input for the current command.

02:26

As you enter a command Auto complete will suggest a list of matching commands

02:32

from the command line.

02:33

You can access other content, such as layers, blocks, hatch patterns and more.

02:40

After typing a command name or input. Press enter

02:45

dynamic input displays the command prompts next to the cursor

02:57

at the bottom of the application window is the application status bar.

03:01

The status bar displays, common drafting aids

03:04

annotation scaling tools and workspace. Customization tools

03:11

tool palettes contain tools to aid in the creation of your design

03:17

tool palettes can also be customized with additional tools and content.

Video transcript

00:06

after startup, you'll see the start tap

00:09

here.

00:09

You can use the start drawing button to begin a new

00:12

drawing or start a drawing from a variety of templates.

00:17

You can also open a drawing from the recent documents list

00:24

In the notifications area.

00:26

You'll receive product update information when it's available and in connect you

00:30

can sign in to your a 360 account or send us feedback.

00:37

The drawing area is where you create and modify objects to represent your design.

00:44

The navigation bar provides access to the steering wheel

00:47

pan

00:47

and zoom.

00:50

Use the menu button in the lower right corner to customize the navigation bar.

00:57

In the lower left corner of the drawing area is the UCS icon,

01:00

which displays the positive directions of the X and Y.

01:03

Axis.

01:06

When you hover over a drawing file tab,

01:08

you'll see preview images of the model and layouts.

01:15

Right click on any drawing file, tap for additional options

01:20

above the file tab is the ribbon.

01:23

The ribbon organizes commands and tools into tabs and panels.

01:28

For example,

01:29

the draw panel on the home tab contains tools to create objects such as lines,

01:34

circles and ellipses.

01:35

While the modify panel contains tools to modify objects such as move,

01:40

copy and rotate

01:44

the quick access toolbar displays frequently used tools,

01:48

you can easily customize this to include the tools you like to use,

01:52

click the application button to create, open or published drawings

01:57

or to search for commands

02:02

in the lower left corner of the drawing

02:04

area are the controls to switch between model space

02:07

where you'll do most of your drawing

02:09

and paper space.

02:10

the layout tabs that allow you to control which area

02:12

of the drawing to publish and at which scale.

02:16

You can add more layouts by clicking on the plus sign.

02:21

Use the command line to start a command and provide input for the current command.

02:26

As you enter a command Auto complete will suggest a list of matching commands

02:32

from the command line.

02:33

You can access other content, such as layers, blocks, hatch patterns and more.

02:40

After typing a command name or input. Press enter

02:45

dynamic input displays the command prompts next to the cursor

02:57

at the bottom of the application window is the application status bar.

03:01

The status bar displays, common drafting aids

03:04

annotation scaling tools and workspace. Customization tools

03:11

tool palettes contain tools to aid in the creation of your design

03:17

tool palettes can also be customized with additional tools and content.

Ribbon

The ribbon is composed of a series of tabs, which are organized into panels. The ribbon can be placed in the following places:

  • Horizontally docked at the top of the drawing area (default)
  • Vertically docked along the right or left edge of the drawing area
  • Undocked, or floating within the drawing area or on a second monitor
AutoCAD LT ribbon with callouts to tabs and panels
 

The ribbon is the primary interface component used to access commands or features. Watch this video to understand ribbon fundamentals.

00:03

The ribbon is the primary interface component used to access commands or features.

00:09

It organizes tools into logical groupings.

00:13

By default, the ribbon appears docked horizontally at the top of the drawing area,

00:18

but it can also be docked vertically along the right or left edge of the drawing area,

00:23

undocked and floated within the drawing area, or even moved onto a second monitor.

00:29

The ribbon is composed of a series of tabs, which are further organized into panels that contain individual tools and controls.

00:37

For example, on the Home tab, you can see panels called Draw, Modify, Annotation, Layers, and so on.

00:47

When you click the Insert tab, you see panels called Block, Block, Definition, Reference, and so on.

00:55

Some ribbon panels provide access to a dialogue box related to that panel.

00:60

For example, on the Annotate ribbon, you can click the dialogue box launcher in the text panel,

01:06

the arrow icon in the lower right corner of the panel to open the Text Style dialogue.

01:12

Click Cancel to close the dialogue.

01:15

Some panels include slide-out panels that contain additional tools and controls.

01:21

For example, click the title of the Dimensions panel to display additional dimensioning commands.

01:27

The slide-out panel automatically closes when you move the cursor away or select some other tool.

01:34

To keep the panel expanded, click the push pin in the bottom left corner of the slide-out panel.

01:40

When you start some commands, a special contextual ribbon tab is displayed instead of a toolbar or dialog box.

01:48

For example, when creating multi-line text, you see the Text Editor contextual ribbon,

01:54

which contains tools for controlling the creation of text.

01:58

You can still switch between this contextual ribbon and any other ribbon tab.

02:03

The contextual tab is closed when you end the command.

02:07

Some buttons on the ribbon are split buttons.

02:10

For example, on the Home ribbon, if you click the top portion of the circle tool,

02:14

you start the Circle command to draw a circle by specifying its center point and radius.

02:21

But if you click the arrow icon in the lower half of the button,

02:24

the button expands into a drop-down, in which you can see all of the various methods available for creating a circle.

02:31

Whichever method you choose becomes the new default.

02:35

For example, if you click 2-Point, notice that the 2-point method now appears and has become the new default method for creating a circle.

02:45

The ribbon also includes galleries.

02:48

For example, if the current drawing contains blocks, when you switch to the Insert ribbon and click the Insert button,

02:55

you see a gallery showing an image of each block definition.

02:59

You can select an item in the gallery to insert that block.

03:03

Galleries are also available for styles that are defined in the current drawing.

03:08

For example, on the Annotate ribbon, you will find galleries for text styles, dimension styles, multi-leader styles, and tables.

Video transcript

00:03

The ribbon is the primary interface component used to access commands or features.

00:09

It organizes tools into logical groupings.

00:13

By default, the ribbon appears docked horizontally at the top of the drawing area,

00:18

but it can also be docked vertically along the right or left edge of the drawing area,

00:23

undocked and floated within the drawing area, or even moved onto a second monitor.

00:29

The ribbon is composed of a series of tabs, which are further organized into panels that contain individual tools and controls.

00:37

For example, on the Home tab, you can see panels called Draw, Modify, Annotation, Layers, and so on.

00:47

When you click the Insert tab, you see panels called Block, Block, Definition, Reference, and so on.

00:55

Some ribbon panels provide access to a dialogue box related to that panel.

00:60

For example, on the Annotate ribbon, you can click the dialogue box launcher in the text panel,

01:06

the arrow icon in the lower right corner of the panel to open the Text Style dialogue.

01:12

Click Cancel to close the dialogue.

01:15

Some panels include slide-out panels that contain additional tools and controls.

01:21

For example, click the title of the Dimensions panel to display additional dimensioning commands.

01:27

The slide-out panel automatically closes when you move the cursor away or select some other tool.

01:34

To keep the panel expanded, click the push pin in the bottom left corner of the slide-out panel.

01:40

When you start some commands, a special contextual ribbon tab is displayed instead of a toolbar or dialog box.

01:48

For example, when creating multi-line text, you see the Text Editor contextual ribbon,

01:54

which contains tools for controlling the creation of text.

01:58

You can still switch between this contextual ribbon and any other ribbon tab.

02:03

The contextual tab is closed when you end the command.

02:07

Some buttons on the ribbon are split buttons.

02:10

For example, on the Home ribbon, if you click the top portion of the circle tool,

02:14

you start the Circle command to draw a circle by specifying its center point and radius.

02:21

But if you click the arrow icon in the lower half of the button,

02:24

the button expands into a drop-down, in which you can see all of the various methods available for creating a circle.

02:31

Whichever method you choose becomes the new default.

02:35

For example, if you click 2-Point, notice that the 2-point method now appears and has become the new default method for creating a circle.

02:45

The ribbon also includes galleries.

02:48

For example, if the current drawing contains blocks, when you switch to the Insert ribbon and click the Insert button,

02:55

you see a gallery showing an image of each block definition.

02:59

You can select an item in the gallery to insert that block.

03:03

Galleries are also available for styles that are defined in the current drawing.

03:08

For example, on the Annotate ribbon, you will find galleries for text styles, dimension styles, multi-leader styles, and tables.


Quick access toolbar

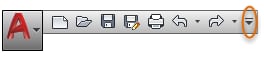
The Quick Access toolbar displays options to undo and redo changes to your work. To undo or redo a less recent change, click the drop-down button to the right of either the Undo or the Redo button.

You can easily add commonly used tools to the Quick Access toolbar by clicking the indicated drop-down button and selecting your choices from the drop-down menu.

Quick Access Toolbar with drop-down menu highlighted
 

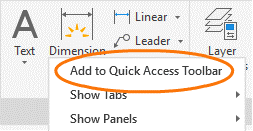
Tip: To quickly add a ribbon button to the Quick Access toolbar, right-click any button on the ribbon, and then click Add to Quick Access Toolbar.

Add to Quick Access Toolbar dialog box
 

Status bar

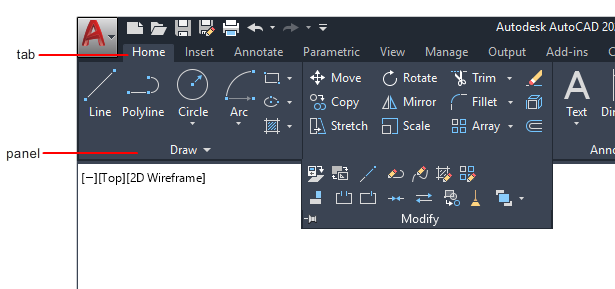
The status bar provides quick access to some of the most commonly used drawing settings.

Using the status bar, you can toggle settings such as:

  • Grid
  • Snap
  • Polar tracking
  • Object snap

You can access additional settings for some of these tools by clicking their drop-down arrows.

Status bar with callouts
Was this information helpful?