Adjust the details pages of workspaces

In this unit, you will learn how to adjust the details pages of new or cloned workspaces. You will also learn how to create a role for a workspace.

00:03

The next step in the module's workflow involves adjusting the details pages of new or cloned workspaces.

00:12

You can use the same tools to configure default workspaces,

00:16

new workspaces you created from scratch or new workspaces you created by cloning.

00:21

To view the tools, expand the Workspace.

00:24

Some of the tools that relate to what's needed after creating a new workspace as referenced in the to do list,

00:32

are Item Details Tab, Descriptor and Tab Names.

00:38

For the Item Details Tab configuration, you can adjust the fields, sections, matrixes and the classifications.

00:45

You can add, remove or change them in the interface shown. Examples will be shown in the upcoming demonstration.

00:54

Every workspace item in Fusion 360 Manage has a descriptor made up of fields selected from the workspace's

01:01

Item Details Tab.

01:03

For example, a descriptor can consist of an item's number and name.

01:07

Descriptors appear on the item header and as the text for item links throughout the UI.

01:13

Note, you can also configure a global descriptor format for all the workspaces on your site.

01:22

The tab names can be adjusted as well to make sure your end users can be sure of what is required to do in each tab.

01:32

In this demonstration we will edit items details pages and create a role for the workspace.

01:39

Let's take a look at the new workspace Design Review - Supplier and its configuration options to make some changes.

01:46

We'll leave workspace settings as they are.

01:50

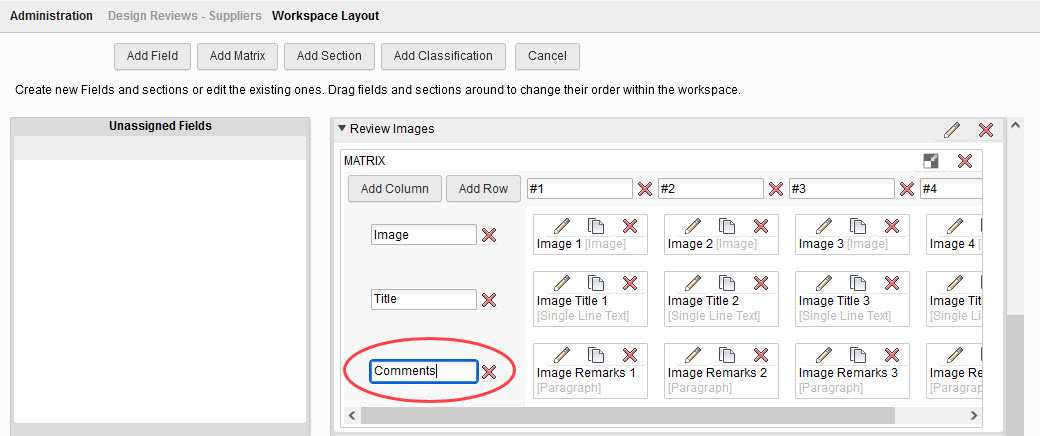
And then in the Details Tab, let's make a change to one of the title names shown in the Review Images section.

02:00

Let's change

02:02

Remarks

02:04

to Comments.

02:09

Also will delete the Number and Sequence fields by clicking the X icons,

02:16

and then create a new field

02:19

by clicking Add Field

02:22

and we'll name it Review ID with a data type of Auto Number and change the menu prefix to be R dash.

02:31

This will automatically number all records created in the Design Reviews - Supplier workspace.

02:39

And then we'll drag it to the top of the list of fields,

02:43

then click Save Layout.

02:47

Now let's choose the fields for the Descriptor.

02:50

For field one will select the new field, Review ID (REVIEW_ID)

02:55

and for field two Title (TITLE),

03:01

save. And the last change will make is to the tab names,

03:08

select Tab Names to change a tab name.

03:11

In this case let's change design review to Review Details.

03:17

And then we click Save.

03:20

Note that if we look at the Workflow Editor, we see that it is blank.

03:24

So that still needs to be set up.

03:28

As you may recall, one or more permission roles for the workspace need to be created to define its functionality

03:36

since users will not be able to see the workspace until you set up a role for it and add users or groups to that role.

03:44

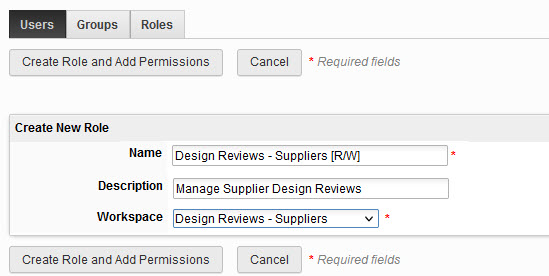
Here we'll step through creating a read write role for the Design Reviews-Supplier workspace.

03:51

So you define the role and then click Create Role and Add Permissions

03:57

and we're adding a few permissions here, clicking the right arrow to add them.

04:04

And after clicking the Save and Manage Groups button, we select the groups that we want associated to this role,

04:16

click the right arrow to add them

04:19

and then click Save.

04:22

Now we'll create a new item in the new Design Reviews - Supplier workspace to view the changes that we made.

04:30

Some of these changes were the Renamed tab to Review Details, the deleted fields of Number and Sequence

04:39

the Renamed Remarks Name to Comments under the Review Images section,

04:43

as well as the changes made to the workspace descriptor with the review ID, dash prefix followed by the title.

Video transcript

00:03

The next step in the module's workflow involves adjusting the details pages of new or cloned workspaces.

00:12

You can use the same tools to configure default workspaces,

00:16

new workspaces you created from scratch or new workspaces you created by cloning.

00:21

To view the tools, expand the Workspace.

00:24

Some of the tools that relate to what's needed after creating a new workspace as referenced in the to do list,

00:32

are Item Details Tab, Descriptor and Tab Names.

00:38

For the Item Details Tab configuration, you can adjust the fields, sections, matrixes and the classifications.

00:45

You can add, remove or change them in the interface shown. Examples will be shown in the upcoming demonstration.

00:54

Every workspace item in Fusion 360 Manage has a descriptor made up of fields selected from the workspace's

01:01

Item Details Tab.

01:03

For example, a descriptor can consist of an item's number and name.

01:07

Descriptors appear on the item header and as the text for item links throughout the UI.

01:13

Note, you can also configure a global descriptor format for all the workspaces on your site.

01:22

The tab names can be adjusted as well to make sure your end users can be sure of what is required to do in each tab.

01:32

In this demonstration we will edit items details pages and create a role for the workspace.

01:39

Let's take a look at the new workspace Design Review - Supplier and its configuration options to make some changes.

01:46

We'll leave workspace settings as they are.

01:50

And then in the Details Tab, let's make a change to one of the title names shown in the Review Images section.

02:00

Let's change

02:02

Remarks

02:04

to Comments.

02:09

Also will delete the Number and Sequence fields by clicking the X icons,

02:16

and then create a new field

02:19

by clicking Add Field

02:22

and we'll name it Review ID with a data type of Auto Number and change the menu prefix to be R dash.

02:31

This will automatically number all records created in the Design Reviews - Supplier workspace.

02:39

And then we'll drag it to the top of the list of fields,

02:43

then click Save Layout.

02:47

Now let's choose the fields for the Descriptor.

02:50

For field one will select the new field, Review ID (REVIEW_ID)

02:55

and for field two Title (TITLE),

03:01

save. And the last change will make is to the tab names,

03:08

select Tab Names to change a tab name.

03:11

In this case let's change design review to Review Details.

03:17

And then we click Save.

03:20

Note that if we look at the Workflow Editor, we see that it is blank.

03:24

So that still needs to be set up.

03:28

As you may recall, one or more permission roles for the workspace need to be created to define its functionality

03:36

since users will not be able to see the workspace until you set up a role for it and add users or groups to that role.

03:44

Here we'll step through creating a read write role for the Design Reviews-Supplier workspace.

03:51

So you define the role and then click Create Role and Add Permissions

03:57

and we're adding a few permissions here, clicking the right arrow to add them.

04:04

And after clicking the Save and Manage Groups button, we select the groups that we want associated to this role,

04:16

click the right arrow to add them

04:19

and then click Save.

04:22

Now we'll create a new item in the new Design Reviews - Supplier workspace to view the changes that we made.

04:30

Some of these changes were the Renamed tab to Review Details, the deleted fields of Number and Sequence

04:39

the Renamed Remarks Name to Comments under the Review Images section,

04:43

as well as the changes made to the workspace descriptor with the review ID, dash prefix followed by the title.

Adjust Details Pages and Create a Role for the Workspace - Exercise

In this exercise, you will edit an item’s details pages and create a role for the workspace. 

Task 1: Edit Details Pages 

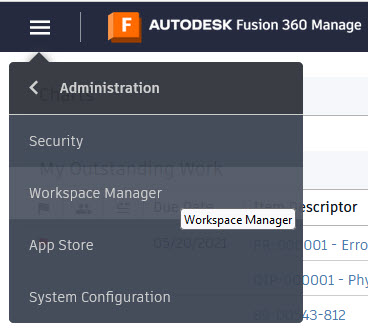
  1. In the navigation menu, select Administration > Workspace Manager.


  2. If you did not complete the previous unit’s exercise, clone the Design Reviews workspace, as follows: 
    • In the Workspace Manager, expand the Design Reviews workspace and click Clone.  
    • For the Workspace Name, enter Design Reviews – Suppliers. For the Description, enter Design Review for Suppliers. Keep all the settings of the original and click Save
  3. Expand the Design Reviews - Supplier workspace. 
  4. Select Workspace Settings and review the settings. No changes are required, so click Cancel to return to the Workspace Manager.  
  5. Select Item Details Tab and scroll to the Review Images section.  Change the Remarks title name to Comments.


  6. Scroll back up to the Details section. Delete the Number field by clicking the X icon at the end of its row. In the Deleting a field dialog that displays, click Confirm.
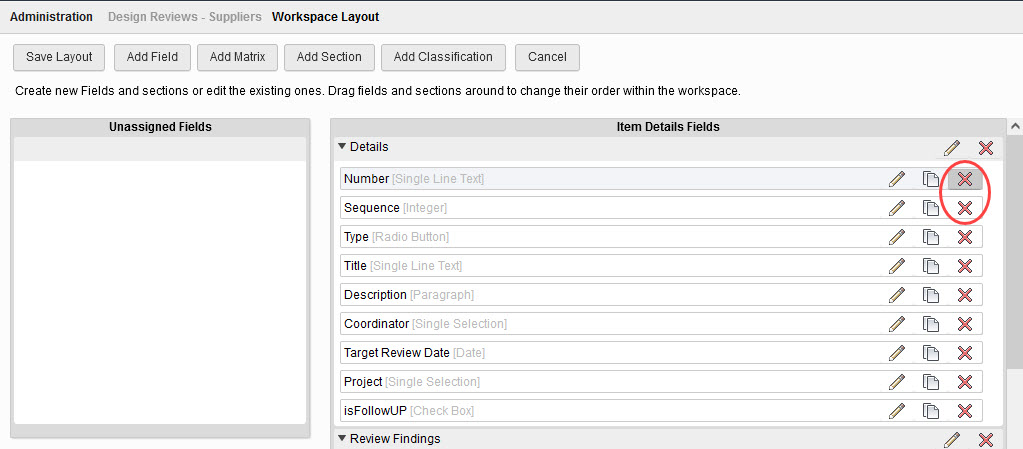


  7. Repeat the process to delete the Sequence field. 
  8. Click Add Field to create a new field. In the Creating a Field window, set the following: 
    • For the Field name, enter Review ID
    • For the Data Type, select Auto Number
    • In the Computed Field Formula, change the NU prefix to be R- (this will automatically number all records created in the Design Reviews – Supplier workspace).
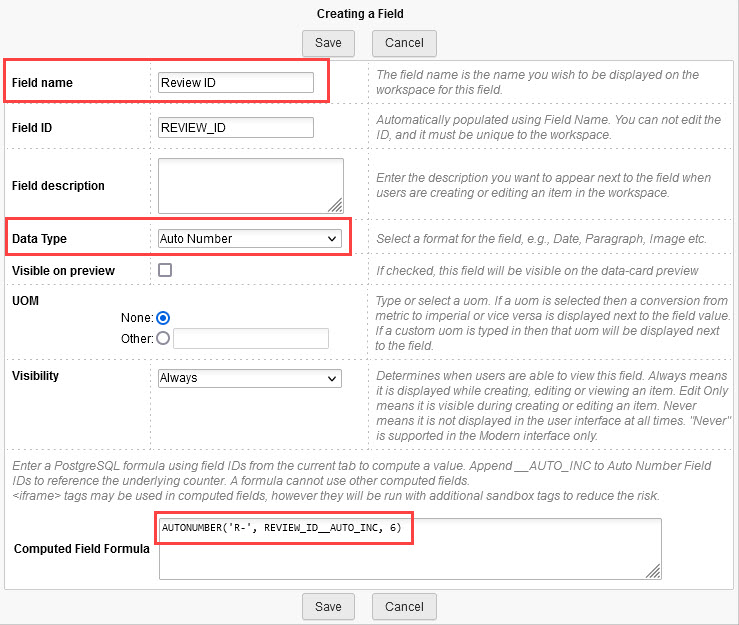
  9. Click Save
  10. The new Review ID field will be listed in the Unassigned Fields section. Select it and drag it to the top of the Item Details Fields list.
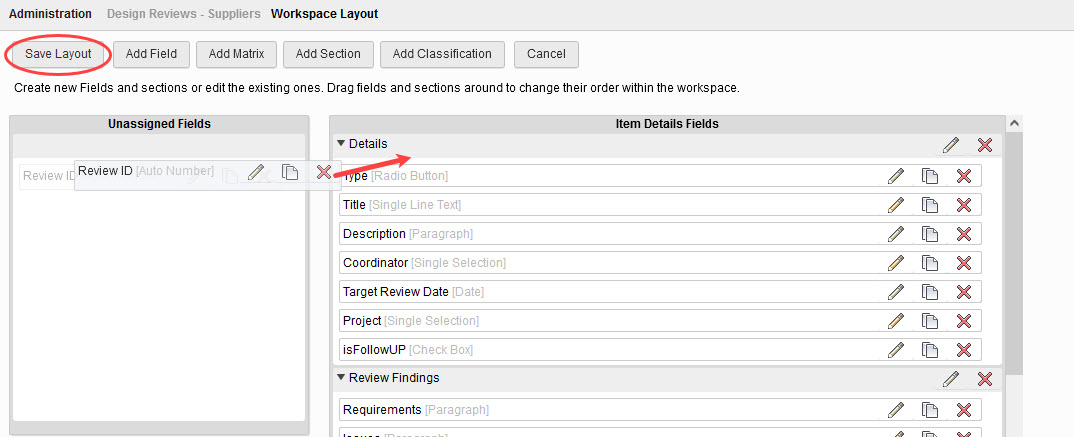


  11. Click Save Layout to save the changes, then click Cancel to return to the Workspace Manager. 
  12. Select Descriptor. In the Descriptor Order section, select the following: 
    • Descriptor Field 1: Review ID 
    • Descriptor Field 2: Title  
    • Descriptor Field 3: --Select-- (to clear the field)
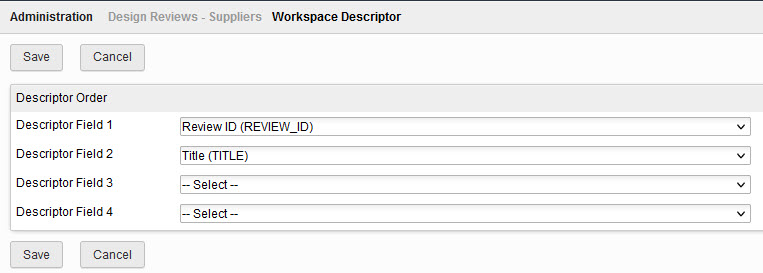


  13. Click Save
  14. Select Tab Names. Change the Design Review tab name to Review Details, then click Save.


  15. Select Workflow Editor. You will notice that it is currently blank and still needs to be set up. This will be covered in the next unit.

Task 2: Create a Role for the New Workspace

As you may recall, one or more permission roles for the workspace need to be created to define its functionality since users will not be able to see the workspace until you set up a role for the workspace and add users or groups to that role. In this exercise, you will create a RW role for the Design Reviews – Supplier workspace. 

  1. In the navigation menu, select Administration > Security
  2. On the Security page, click New Role.


  3. In the Create New Role section, set the following: 
    • Name: Design Reviews – Suppliers [R/W] 
    • Description: Manage Supplier Design Reviews 
    • Workspace: Design Reviews – Supplier


  4. Click Create Role and Add Permissions
  5. Select the required available permissions from the list on the left, then click the right arrow to add them to the Design Reviews – Supplier [R/W] role. 
    • If you are unsure of which permissions are required, you can refer to the default Design Reviews [R/W] role. 
  6. Click Save and Manage Groups
  7. Select the required groups to be associated to the role from the list on the left, then click the right arrow to add them to the Design Reviews – Supplier [R/W] role. Click Save when finished.
Was this information helpful?