00:08
Hello and welcome to understanding BIM
00:10
data exchange methods within the design collaboration tool.
00:15
There are three options for exchanging data
00:18
that we have live linking.
00:20
We have shared linking
00:22
and finally, we have consumed linking.
00:25
Now, let's take a look at what those three options are
00:28
of confusion within the design
00:30
collaboration tool is that models can live in
00:33
three different places along with there being
00:35
three different options for linking the data.
00:38
First, let's look at zero gate or live linking.
00:42
You can see here we have our folders, architectural, structural mechanical,
00:46
they correspond with our teams here in
00:49
design collaboration.
00:51
The live linking option refers to
00:54
if you click on architectural folder, we see our work in progress model right here.
00:59
So live linking means,
01:01
hey, we're going to go ahead and link that model within our Revit
01:10
that comes with a certain amount of risk. So consider your
01:14
project team structure before doing so or linking this method. If you're
01:19
all on the same company,
01:20
you have all the disciplines in house and you communicate regularly.
01:22
Obviously, that's going to be less risky than if it's
01:25
companies in the widely dispersed team. You know,
01:28
just so you know, that, that you're linking them out, at least,
01:31
you know, at least know the risks associated.
01:39
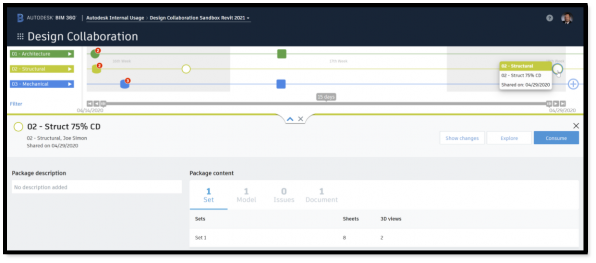
or one gate shared linking directly involves packages created by teams.
01:45
So if we're looking at
01:47
design collaboration, we can see all these circles,
01:50
what these circles represent are actual packages,
01:53
teams have created to share
01:56
with other teams. So we can see the packages. So when a team creates the packages and
02:01
goes ahead and shares that with the team,
02:03
it puts the circle on the timeline and open indicates it has not been consumed,
02:09
you know, the architectural team has consumed it. So
02:12
every time a package is created and shared, what the tool does is
02:18
it automatically creates a shared folder here in our project files.
02:22
And within that shared folder,
02:24
it starts tracking the versions of those models as we're going through.
02:27
So we can see architectural has 22 versions,
02:42
a variation of one version up to three versions.
02:46
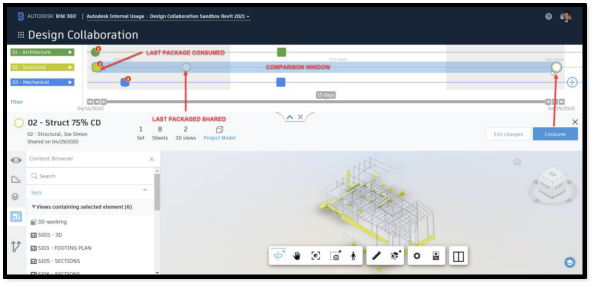
And our last method of sharing
02:49
involves a two gate system of
02:52
linking. For instance, we're looking at our structural model here. We can see
02:57
there's an open mechanical package
02:59
for us here to look at. So if we click on that as a structural team,
03:04
what it does is it brings in and allows us to
03:07
automatically consume it if we're confident that we don't need
03:11
to understand the changes or we have the option of
03:15
If we're pretty familiar with it,
03:16
we can come in here and kind of look
03:17
at anything that we may be specifically looking for,
03:21
you know, just to make sure it's there,
03:23
we back out a little bit here or we can, you know,
03:26
hey, that's what changed between those, that package
03:29
and the last package that I consumed.
03:31
So here we can see, OK, now we really understand
03:34
what happened to the changes. So we can see,
03:37
you know what's been added,
03:39
what's been removed and what's been modified. And you can look around at that
03:44
until you get a full grasp of the concept of what's been happening with it.
03:48
We can turn these on and off as we want to. So if we wanted to just see what was added,
03:53
we certainly can see, you know, what was added
03:56
and we're not limited to just our 3D view. If we go to our content browser
04:00
and start clicking around in the
04:05
you know, visualize those changes in here as well. So
04:08
that gives us the ability to understand, OK.
04:11
What changed in relation to my work in progress model?
04:14
I can go ahead and choose to consume that folder.
04:17
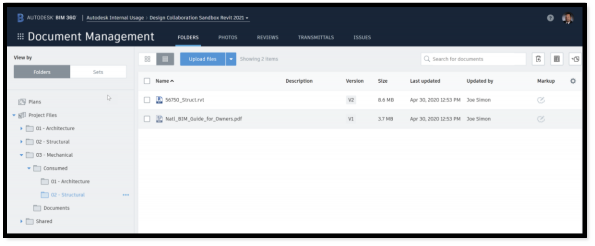
So I'm structural consuming the mechanical,
04:22
and what that does it processes that change. Now, if we look in document management
04:27
at our structural folder,
04:30
we will see a consume folder automatically created.
04:32
If we click on that, it opens up our disciplines that we've consumed in the past
04:36
and we can click in here and we can see
04:40
there's our mechanical file
04:43
that we just consumed. It's the version, you can see the time coincide.
04:46
So that is what we link to rev it.
04:51
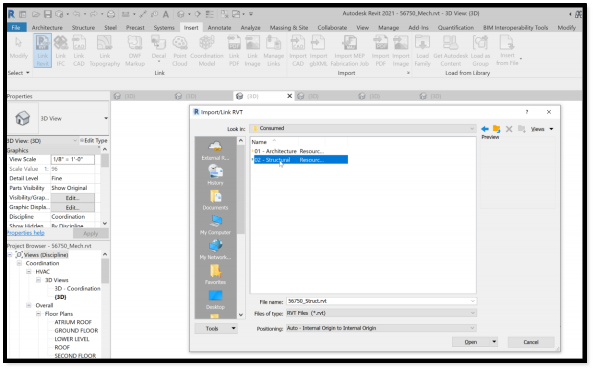
Now, how do we go ahead and link that to rev? You can see we're in a rev cloud shared
04:55
structural model. We can come in and we're gonna go ahead and insert the link,
05:01
Notice the default to
05:07
it defaults to our project, right?
05:09
So what took us into a design collaboration project?
05:11
Now, we can just go to project files,
05:13
we can go to our team structural,
05:16
we can go to our consume folder.
05:18
So this is the highest,
05:19
this is the highest vetting we can do in a model before bringing in our team.
05:22
Click on mechanical.
05:24
Go ahead and grab that mechanical,
05:27
it's going to insert it into our project, OK.
05:35
now we would be able to see
05:42
OK there e have it. Now, we can see our mechanical model within our structural.
05:46
So we can go ahead and do
05:47
some visual quality checks
05:50
and make sure everything looks as expected.
05:53
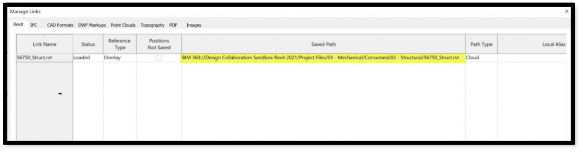
Also, one last thing to point out
05:56
is if we look at our managed link that's recently added,
05:59
we have the ability to now to see that full path. So
06:03
it used to be a little bit truncated,
06:06
but now you can see we're pulling it in all the way from our consumed and disciplined.
06:11
good visual indicator that allows us to be
06:14
sure that we're referencing in from the right place.
06:18
Thank you for your time.