Checking Member Releases

00:00

MARTHA HOLLOWELL ORCUTT: Developing

00:02

the Analytical Model in Revit, Checking Member Releases.

00:06

When you are preparing a Revit model

00:07

to be transferred to Robot or other structural analysis

00:10

programs, you need to review the structural member releases

00:14

to verify that they are correct.

00:16

Default releases can cause problems

00:19

with the stability of the model and should

00:21

be specified directly depending on the structural behavior

00:24

of the specific member.

00:26

In this video, we will review how you check

00:29

the analytical member releases.

00:32

I'm working in the small medical center project,

00:35

and in the 3D view, I'm going to zoom in and select

00:38

a structural framing member.

00:40

You can choose multiple elements,

00:41

but they have to be the same type--

00:43

all beams, for example, not beams and braces.

00:47

Now, in Properties, I'm going to expand the list

00:51

and specify specifically the analytical beam part.

00:55

This is one way to verify you're working

00:57

with the analytical elements in a model.

01:00

Next, I'm going to scroll down to the Releases Member Forces

01:04

area, and you can see that I can modify

01:07

the specific forces to release their degree of freedom.

01:12

My end release is set to pend in this example.

01:17

Now I want to open the analytical model

01:19

and select that same beam you can see here.

01:25

I have the same information that's showing up here

01:28

in my Properties, as well.

01:32

Now, let me zoom in on this beam,

01:34

and I'm going to change so that I

01:36

have my thin lines off so I can see

01:39

the colors a little bit better.

01:41

And now you can see, here's this beam,

01:43

and I have the end of my beam and the start

01:46

of my beam color coded.

01:50

This color coding is set up in visibility graphics,

01:53

so I'm going to type VV to open the Visibility Graphic dialog

01:59

box, and on the Analytical Model Categories tab,

02:03

I can expand Analytical Beams and see the end segments.

02:08

I'm going to click on Object Properties,

02:11

and now I can see that the colors for the end

02:13

is set to red and the start is set to green.

02:22

You want to work through each of the elements

02:24

and verify that the start and end releases match

02:27

the need of the model before you export

02:30

the file to Robot or other structural analysis programs.

Video transcript

00:00

MARTHA HOLLOWELL ORCUTT: Developing

00:02

the Analytical Model in Revit, Checking Member Releases.

00:06

When you are preparing a Revit model

00:07

to be transferred to Robot or other structural analysis

00:10

programs, you need to review the structural member releases

00:14

to verify that they are correct.

00:16

Default releases can cause problems

00:19

with the stability of the model and should

00:21

be specified directly depending on the structural behavior

00:24

of the specific member.

00:26

In this video, we will review how you check

00:29

the analytical member releases.

00:32

I'm working in the small medical center project,

00:35

and in the 3D view, I'm going to zoom in and select

00:38

a structural framing member.

00:40

You can choose multiple elements,

00:41

but they have to be the same type--

00:43

all beams, for example, not beams and braces.

00:47

Now, in Properties, I'm going to expand the list

00:51

and specify specifically the analytical beam part.

00:55

This is one way to verify you're working

00:57

with the analytical elements in a model.

01:00

Next, I'm going to scroll down to the Releases Member Forces

01:04

area, and you can see that I can modify

01:07

the specific forces to release their degree of freedom.

01:12

My end release is set to pend in this example.

01:17

Now I want to open the analytical model

01:19

and select that same beam you can see here.

01:25

I have the same information that's showing up here

01:28

in my Properties, as well.

01:32

Now, let me zoom in on this beam,

01:34

and I'm going to change so that I

01:36

have my thin lines off so I can see

01:39

the colors a little bit better.

01:41

And now you can see, here's this beam,

01:43

and I have the end of my beam and the start

01:46

of my beam color coded.

01:50

This color coding is set up in visibility graphics,

01:53

so I'm going to type VV to open the Visibility Graphic dialog

01:59

box, and on the Analytical Model Categories tab,

02:03

I can expand Analytical Beams and see the end segments.

02:08

I'm going to click on Object Properties,

02:11

and now I can see that the colors for the end

02:13

is set to red and the start is set to green.

02:22

You want to work through each of the elements

02:24

and verify that the start and end releases match

02:27

the need of the model before you export

02:30

the file to Robot or other structural analysis programs.

When you are preparing a Revit model to be transferred to Robot or other structural analysis programs you need to review the structural member releases to verify they are correct. Default releases can cause problems with the stability of the model and should be  specified directly depending on the structural behavior of the specific member. In this practice you will review how you check the analytical member releases.

  1. Open the Small Medical Center-Analytical Member Release.rvt project.
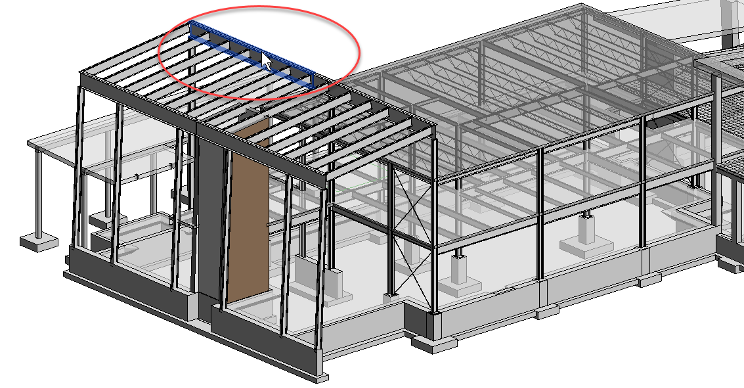
  2. In the {3D} view select the structural framing member shown below.

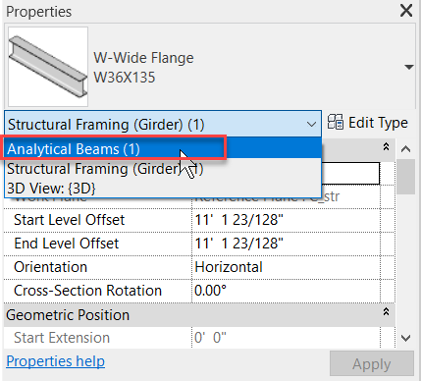
  1. In Properties, expand the list shown below and select Analytical Beams. This is one way to verify that you are working with the analytical elements in a model.
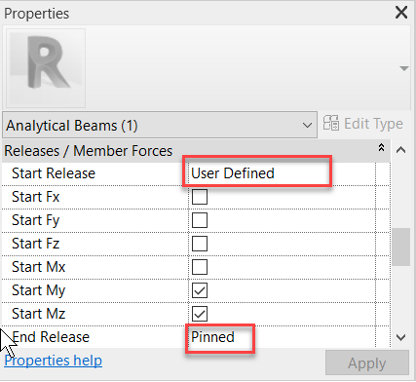
  2. Scroll down in  Properties to the Releases/Member Forces area as shown below. You can see that the User Defined release is defined for the Start of the beam and and Pinned release is defined for the End of the b
     
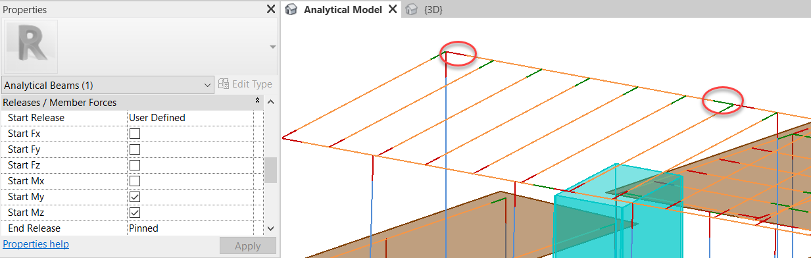
  3. Open the 3D Analtyical Model view and zoom in on the same beam. You can distinguish between the start and the end of analytical beam – displayed in green and red respectively :

  1. The colors of the start and end are controlled by Visibility Graphics.  Type VV to open the Visibility/Graphic Overrides dialog box.
  2. In the Analytical Model Categories tab expand Analytical Beams to see that the End Segment and Start Segment are options, as shown below
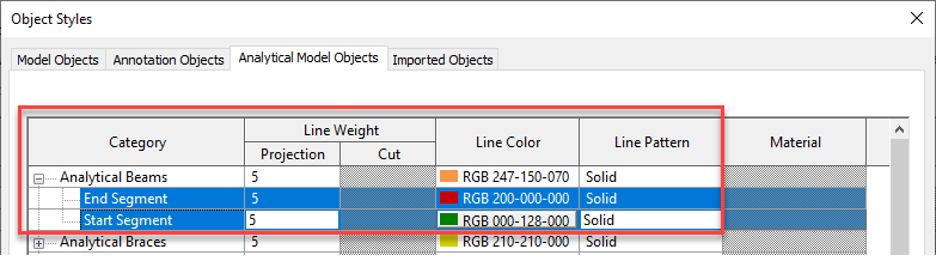
  3. Click Object Styles and you can review the colors for Analytical Beams. End Segment is Red and Start Segment is green, as shown below.

  1. Click OK to back out of the dialog boxes.
  2. Work through each of the elements and verify that the Start and End Releases match the need of the model before you export the file to Robot or other structural analysis program.
Was this information helpful?