00:07
INSTRUCTOR: Sometimes, your extended team
00:09
needs digital files instead of printed sheets.
00:11
If they're using Revit, you can simply
00:13
share your model with them.
00:14
If they need a PDF, then simply print
00:17
but choose a PDF printer instead of a physical device.
00:20
If they're using AutoCAD or some other similar software,
00:24
then you can export to DWG or other popular file formats.
00:28
So let's look at the process to export to DWG.
00:32
We'll go to the File menu and then highlight Export.
00:35
And then up here near the top, you'll see CAD Formats.
00:38
And notice that there are four different formats
00:40
that you can export to.
00:44
At the top, there's a dropdown for Export Setups.
00:47
So optionally, you can save custom configurations,
00:50
and they will show up in that list.
00:52
To edit the setup, you use this Browse button right here.
00:55
And that will take you to a rather extensive dialog where
00:58
you have lots of settings that you can configure
01:00
to create an export setup.
01:03
Now, the one that's probably the most extensive
01:08
Most CAD files are organized into layers.
01:10
And you can see here that all of the Revit categories
01:14
get mapped to a layer in AutoCAD and a corresponding color
01:19
Now, you can go through this list
01:22
and customize it object by object, layer by layer
01:25
Or you can use one of the pre-built industry
01:28
standards that appears here on this dropdown.
01:31
So feel free to explore this and make any customizations
01:36
Now, you can do similar things on the Lines tab
01:38
to map the line styles in Revit to line types in AutoCAD.
01:43
Or the patterns in Revit to hatches in AutoCAD,
01:46
and the text and the fonts.
01:48
And how do you want to treat colors?
01:49
And what do you want to do with 3D geometry
01:52
when you're exporting 3D views?
01:53
How do you want to treat your units?
01:55
And finally, on the General tab are
01:57
some miscellaneous settings, perhaps the most important one
01:60
being which file format do you want to export to.
02:04
So make sure you communicate with your recipient
02:06
and find out which version of AutoCAD
02:07
they're planning to open these files in.
02:09
And then choose an appropriate format from the list.
02:12
Now, I'm not going to make any changes to the export setup,
02:15
so I will simply cancel that.
02:16
But you're welcome to make whatever changes you like.
02:19
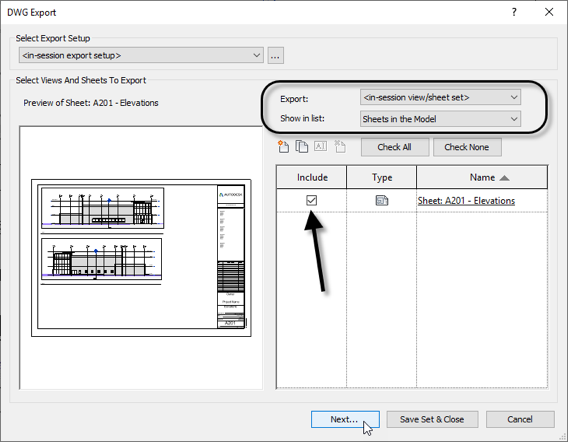
Next, you want to go to the Export dropdown here.
02:22
And you have two choices as far as
02:24
what's going to actually be exported from the Revit model.
02:28
Now, it defaults to the current view and sheet only.
02:30
So whatever you have open here in the background-- in my case,
02:34
this elevation sheet--
02:36
that's what's going to be export.
02:37
Otherwise, you can choose the second option,
02:40
and that gives you another dropdown.
02:42
So here you have some additional choices
02:44
that let you look at the views and/or the sheets that
02:48
If you go to the very bottom here,
02:49
All Views and Sheets in the Model, this
02:51
will give you a complete list of every view and every sheet
02:55
that's on the project browser.
02:57
And then you can check the ones that you
02:59
want to include in the export.
03:01
So let's say that I wanted to include
03:03
a floor plan and this elevation sheet, and I'll click Next.
03:08
You want to browse to a folder where
03:09
you want to make this export to, give it a file name prefix.
03:14
Naming will default to automatic naming,
03:16
which will use that prefix when creating the name.
03:19
And then finally, at the bottom is perhaps
03:21
what I think is the most interesting setting.
03:24
It's a checkbox that says Export Views on Sheets and Links
03:29
as External References.
03:30
So what this means if you consider this sheet
03:33
in the background is I would actually get three DWG files--
03:36
one for the sheet itself and then one
03:38
for each of the viewports that will be xrefed back
03:41
into that main sheet.
03:43
So assuming that you're satisfied with all the settings
03:45
here, you can click OK, and it should only
03:48
take a moment or two for the export to be performed.
03:51
Now, if you have a copy of AutoCAD,
03:53
you are welcome to open up the results and take a look.
03:57
So here I have the elevation sheet with its two viewports
04:01
containing the two xrefs.
04:03
And here's one of those xrefs opened up independently.