• InfoWater Pro

Modifying the demands in a scenario

Modify the demands of a new scenario in the DB Editor.


Tutorial resources

These downloadable resources will be used to complete this tutorial:


00:03

A new scenario has been created based on existing settings

00:08

to set up the conditions for analysis of this scenario.

00:11

You can modify the demands within it

00:14

to begin.

00:15

Double click the desired project dot APR

00:18

file to open

00:19

Agis Pro.

00:21

Once the project starts,

00:22

click the info water pro tab to open the info water pro ribbon

00:27

in the project panel, click initialize

00:31

in the model explorer on the attribute tab use the drop down list to select the E

00:36

max day scenario

00:39

at the prompt click. OK to confirm switching to this scenario,

00:44

the

00:44

max day scenario is activated.

00:47

Keep in mind that any edits you make with this

00:49

scenario active will impact the data sets associated with it

00:54

to further confirm that the correct scenario is active, open scenario explorer.

00:60

Here you can see that

01:01

max day is selected

01:04

exit the scenario explorer

01:07

on the info water pro ribbon in the edit panel, click DB editor

01:13

in the DB editor window. Notice that the current demand set is displayed as active

01:18

max day

01:20

in the data table.

01:21

Expand the element hydraulic data folder

01:23

and select junction demand modeling data.

01:27

Then under data scope, select entire table and then click, OK.

01:33

The DB editor opens,

01:36

click the header of the demand one GPM column to select the column.

01:40

And then in the toolbar, click block editing.

01:43

Alternatively you can right click the column

01:46

header and choose block editing from there.

01:48

Either method opens the block edit window

01:52

here. Set the operation to multiply by and the value to 1.2

01:58

click. OK?

02:00

All demands in the

02:02

max day database are increased by 20 per cent

02:06

click.

02:07

Save to save the changes to the database table and then exit to close the DB editor.

02:13

Now the existing conditions of this scenario

02:15

reflect the maximum demands for this network.

Video transcript

00:03

A new scenario has been created based on existing settings

00:08

to set up the conditions for analysis of this scenario.

00:11

You can modify the demands within it

00:14

to begin.

00:15

Double click the desired project dot APR

00:18

file to open

00:19

Agis Pro.

00:21

Once the project starts,

00:22

click the info water pro tab to open the info water pro ribbon

00:27

in the project panel, click initialize

00:31

in the model explorer on the attribute tab use the drop down list to select the E

00:36

max day scenario

00:39

at the prompt click. OK to confirm switching to this scenario,

00:44

the

00:44

max day scenario is activated.

00:47

Keep in mind that any edits you make with this

00:49

scenario active will impact the data sets associated with it

00:54

to further confirm that the correct scenario is active, open scenario explorer.

00:60

Here you can see that

01:01

max day is selected

01:04

exit the scenario explorer

01:07

on the info water pro ribbon in the edit panel, click DB editor

01:13

in the DB editor window. Notice that the current demand set is displayed as active

01:18

max day

01:20

in the data table.

01:21

Expand the element hydraulic data folder

01:23

and select junction demand modeling data.

01:27

Then under data scope, select entire table and then click, OK.

01:33

The DB editor opens,

01:36

click the header of the demand one GPM column to select the column.

01:40

And then in the toolbar, click block editing.

01:43

Alternatively you can right click the column

01:46

header and choose block editing from there.

01:48

Either method opens the block edit window

01:52

here. Set the operation to multiply by and the value to 1.2

01:58

click. OK?

02:00

All demands in the

02:02

max day database are increased by 20 per cent

02:06

click.

02:07

Save to save the changes to the database table and then exit to close the DB editor.

02:13

Now the existing conditions of this scenario

02:15

reflect the maximum demands for this network.

Step-by-step:

A new scenario has been created, based on existing settings. Modify the demands within it to set up the conditions for analysis of this scenario.

  1. Open the appropriate .aprx file in ArcGIS Pro.
  2. From the ribbon, InfoWater Pro tab, Project panel, click Initialize.
  3. In the Model Explorer, select the EX_MAXDAY scenario.Model Explorer with EX_MAXDAY scenario selected
  1. At the prompt, click OK to confirm switching to this scenario.

The EX_MAXDAY scenario is activated. Keep in mind that any edits you make with this scenario active will impact the datasets associated with it.

  1. To further confirm that the correct scenario is active, open Scenario Explorer.
    Model Explorer with Scenario Explorer icon highlighted
  1. In the Scenario Explorer, you can see that EX_MAXDAY is selected. Exit the Scenario Explorer.
  2. To modify the demands in the EX_MAXDAY scenario, on the InfoWater Pro ribbon, in the Edit panel, click DB Editor.

In the DB Editor window, notice that the current Demand Set is displayed as *ACTIVE* (EX_MAXDAY).
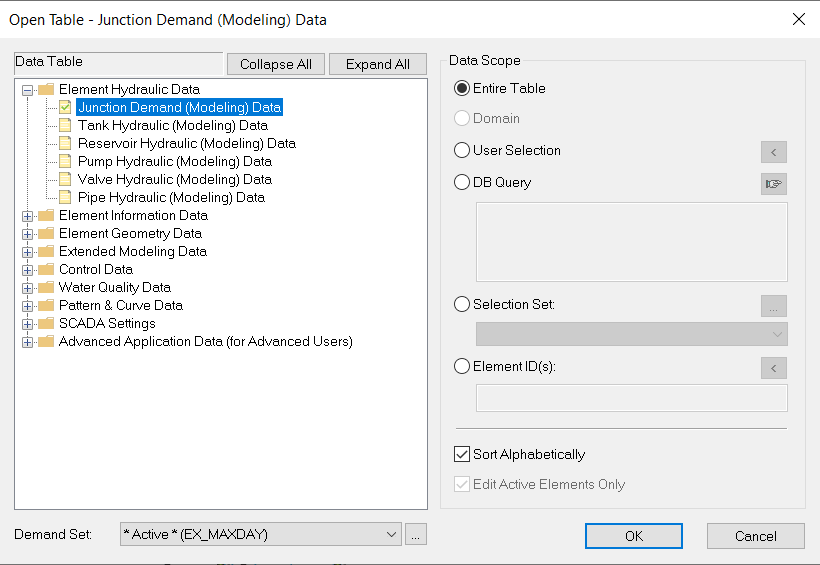
  1. In the Data Table, expand the Element Hydraulic Data folder and select Junction Demand (Modeling) Data.
  2. Under Data Scope, select Entire Table.
  3. Click OK.
    Open Table window with settings for this tutorial
  1. In the DB Editor, click the header of the Demand 1 (gpm) column to select the column.
  2. In the toolbar, click Block Editing.
    The DB Editor, with the Demand 1 (gpm) column selected and the Block Editing icon highlighted
  1. In the Block Edit popup, set the Operation to Multiply By (*).
  2. For the Value, type 1.2.
    The Block Edit popup, with settings configured
  1. Click OK.

All demands in the EX_MAXDAY database are increased by 20%:
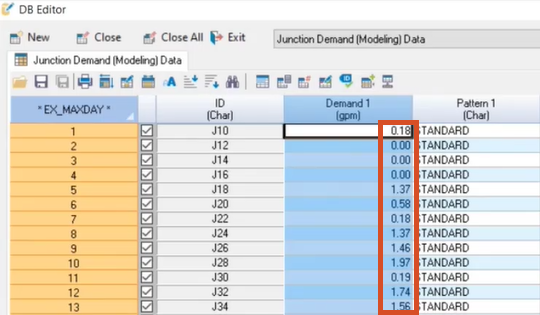
The DB Editor displaying the 20% increased Demand 1 fields

  1. Click Save to save the changes to the database table.
  2. Exit to close the DB Editor.

Now, the existing conditions of this scenario reflect the maximum demands for this network.

Was this information helpful?