00:00
DEEPAK MAINI: Hey, guys.
00:01
Welcome to the first objective of this course.
00:04
In this objective, we are going to download the BIM 360
00:07
mobile app, and we are going to understand the interface.
00:13
Now before we get into downloading the app,
00:15
there are a couple of things that I want to mention here.
00:18
The first one is that the BIM 360 mobile app
00:20
is available for both iOS and Android platforms.
00:25
There are a few differences between the way the apps work
00:28
on these two platforms.
00:30
All these differences are available on the Autodesk
00:33
Knowledge Network page.
00:34
But just to go over a few of them, for example,
00:38
on the iOS devices, you can search and sort data
00:42
by filename, document name, last modified, and so on.
00:46
On the iOS devices, if you open a document
00:49
and it's not the latest version, you will get the warning,
00:52
however, the Android devices will not show that warning.
00:56
Similarly, I have listed a few other differences here.
00:59
But as I mentioned earlier, if you go to the Autodesk
01:02
Knowledge Network page, you'll be
01:04
able to see all the differences there.
01:06
The next important thing that I want to mention here
01:09
is in my case, I have created this course using my iPad, so
01:15
But if you're using the Android device,
01:17
pretty much everything that I'm going to show you
01:19
will work on those devices as well.
01:21
With this, let's switch over to my iPad now.
01:25
So this is my iPad now.
01:27
I'm going to go to the app store,
01:29
and I'm going to search for BIM 360 app.
01:35
Now please note that when I search for BIM 360,
01:38
it is also going to show some additional apps like BIM 360
01:41
globe, BIM 360 field, and so on.
01:43
But the app that we are after is this one here that is BIM 360.
01:47
Let me download this app now.
01:51
Now in my case, I've got a folder
01:53
created on my iPad, where I save all my BIM 360 related apps.
01:57
So once I have downloaded this app,
01:59
I'm going to move it into that folder as well.
02:03
I'm going to exit out of this.
02:05
And this is my BIM 360 app listed here now.
02:08
I'm going to move it into the right folder.
02:11
And again, you don't have to do it.
02:12
But I just prefer having all my BIM 360
02:15
apps sitting in the right folder,
02:16
and that I can easily access them.
02:19
So if I go into this folder now, that's my BIM 360 app.
02:24
I'm going to tap on it.
02:26
The first thing it's going to do is ask me
02:28
to sign in so let me sign in.
02:31
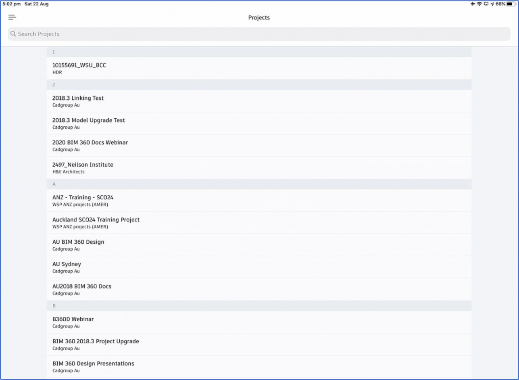
So once you have signed into this app,
02:34
you can see all your projects available here.
02:37
We also have the search project fill at the top
02:41
where I can search for projects.
02:44
That it, this is the project I want to go to.
02:46
I'll tap on to this project.
02:48
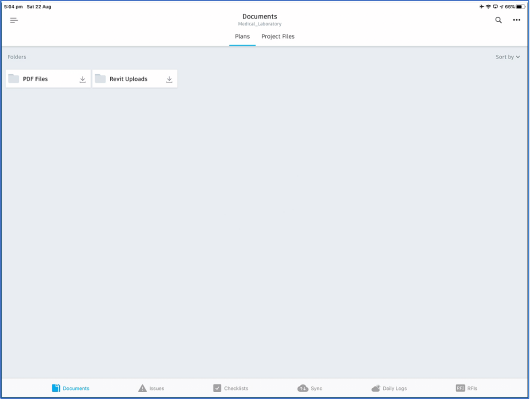
And now this is how the project interface
02:50
looks like on the BIM 360 app.
02:53
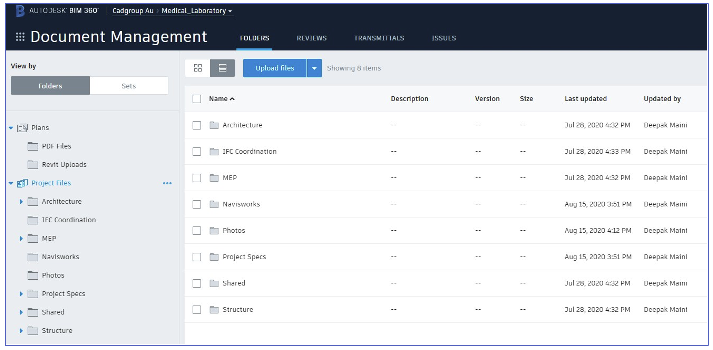
Let's now understand this interface.
02:55
Currently as you can see, I'm in the plans area,
02:58
and I can see the two folders in the plans area.
03:00
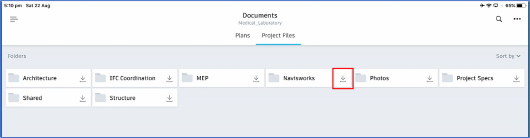
Similarly, if I tap on the project files area,
03:04
I can see all the folders in the project files area.
03:06
You will notice that all these folders have these down arrows
03:09
on the right of their names.
03:11
These down arrows let me download
03:13
the content of these folders for offline viewing.
03:17
So for example, I want all the project specs
03:19
available in the offline mode as well.
03:21
In that case, I'm going to tap on this down arrow.
03:25
And it starts to download the content of that folder
03:28
and any sub folders inside it for offline viewing.
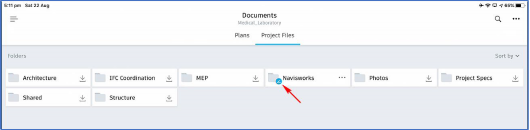
03:32
Once the content of the folder has
03:34
been downloaded for offline viewing
03:36
I can see this thick mark here if I tap on this folder now.
03:41
I can see all the sub folders have the thick mark as well,
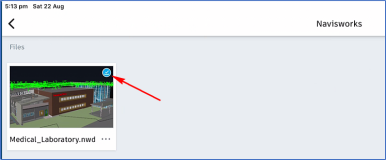
03:44
and also any other document that is sitting inside that folder.
03:48
Now if the content of any of this folder is updated,
03:51
I can simply tap on these three dots,
03:54
and I can set update this folder.
03:56
You will notice that we have got some options
03:58
available down the bottom.
03:60
As you can see, we are in the documents area right now.
04:03
If I tap on issues, I can see all the issues
04:06
that are currently active in this particular project.
04:10
Similarly, I have got some checklist option here.
04:12
If I tap on checklist, I can see any checklist
04:15
that has been completed or not started.
04:18
Now please note the reason I'm able to see the checklists
04:21
and the daily logs option down the bottom
04:24
is because this project has got field management service active
04:29
Also, the reason I'm seeing RFI option on the bottom
04:32
is because it's got project management service active.
04:35
Please note that project management service is
04:37
part of BIM 360 build program.
04:41
So if you've got BIM
04:43
you can activate project management service as well.
04:46
Notice that we have got this sync option here.
04:49
This option is only used if you have done
04:51
some work in the offline mode.
04:53
For example, you have run some checklists
04:55
and created some issues.
04:57
In that case, you'll have to sync manually.
04:59
Otherwise, the BIM 360 mobile app continuously
05:02
sinks in the background, and you don't
05:03
have to manually sync anything.
05:06
I now want to go back one level so I can tap
05:09
on this arrow on the top left.
05:12
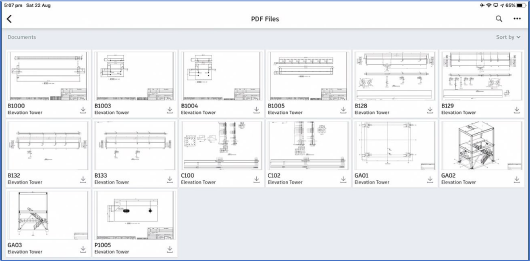
I'm going to go to the plans area now,
05:14
and let's click on PDF files.
05:17
Now as you are aware of this, in the plans area when I upload
05:20
a PDF file, all the sheets of a multi-page PDF file
05:25
are automatically extracted for viewing.
05:27
And that's what you are seeing here.
05:29
Same thing with rivette files as well.
05:31
When they are uploaded in the plans area,
05:33
all the sheets and views are extracted for viewing.
05:38
Going back into project files area.
05:40
If I tap onto the shared folder, and let me now
05:43
tap on the structure folder.
05:46
I've got this model here, but I don't see any views or sheets
05:50
that's because those views and sheets are
05:52
only available once I tap on that model to open it.
05:55
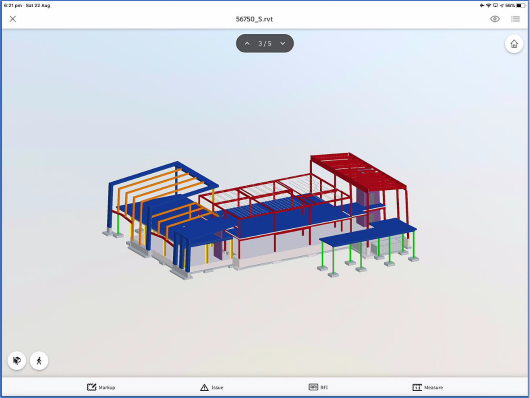
As you can see, it's opening that model now.
05:58
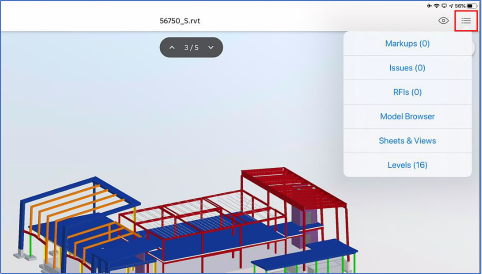
Once that model is open, I can tap on the menu
06:01
button on the top right.
06:04
And I can now look at views and sheets.
06:10
To close out of this model, I can
06:12
click on the cross button on the top left.
06:14
And similarly, I can tap on to this air
06:16
on the top left to go back to the folder levels.
06:21
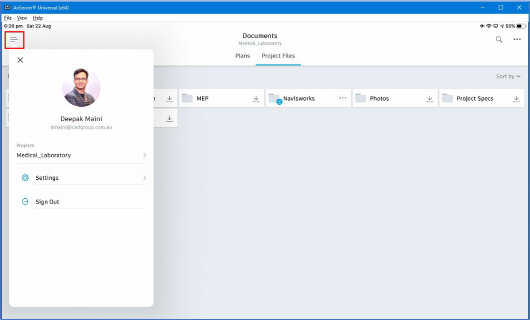
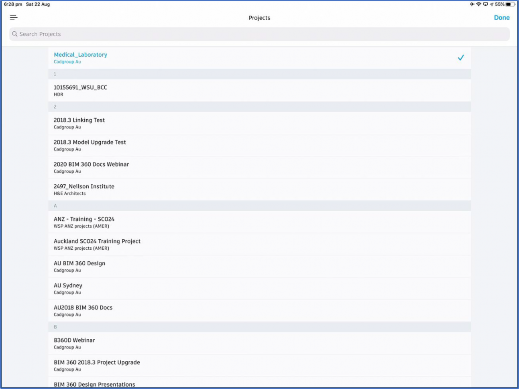
Now if I need to change the project that I'm in,
06:24
I can tap on this menu button on the top left.
06:27
It shows me the project that I'm currently in.
06:30
I can now tap on this project name,
06:32
and it shows me the list of all the available projects.
06:35
Again, I can either use the search projects field,
06:38
or I can simply tap on the project the diemen.
06:41
If I tap on this menu button on the top left again,
06:44
I can sign out of this app or I can look at the app settings.
06:48
That's all we have in this objective.
06:50
I'll see you in the next objective.