Define workflows using Workflow Editor

In this unit, we will provide an overview of workflows. You will then learn how to define a workflow using the tools in the Workflow Editor.

00:03

The next step in the module's workflow is overview of workflows.

00:09

A workflow refers to a sequence of transitions that are performed to complete a process.

00:15

At any point within these transitions the workflow is at a certain state.

00:20

A workflow can be viewed under the Workflow tab of an item.

00:23

Shown here are the elements of a workflow for an approval process workflow.

00:28

Starting point, state, locked state and transition.

00:32

Typically transitions use a verb for the name.

00:36

Every transition in a workflow has a workflow permission associated with it.

00:41

To perform that transition, a user must have the permission associated with it.

00:49

The next step in this module's workflow is to define workflows using Workflow Editor.

00:57

You create a workflow by selecting Workflow Editor from the list of workspace configuration tools.

01:04

Shown here is a view of the Workflow Editor interface with the tools available for adding states,

01:10

notes and transitions as well as viewing tools.

01:13

Note that copy and paste can also be used to copy all or some of the workflows from other workspaces.

01:22

Next, a demonstration will introduce you to the Workflow Editor tools.

01:28

In this demonstration, we will create a workflow for the Design Reviews - Supplier workspace

01:35

by copying and pasting the workflow from the design reviews workspace.

01:39

Once that is done, we will edit the workflow using the Workflow Editor tools.

01:44

In the Workflow Editor of the Design Reviews workspace, we use Ctrl A to select the entire workflow

01:51

and then use the Copy icon in the Workflow Editor toolbar to copy it to the clipboard.

01:59

Then we expand the Design Reviews - Supplier workspace,

02:03

select Workflow Editor and this time, use the P aste icon to paste the workflow into the editor.

02:11

We can drag and drop items to move them into place as shown here.

02:15

Now we'll explore some of the other tools and the workflow editors, such as the Fit to window icon

02:21

to fit the workflow in the window and then the Zoom out and in icons.

02:30

The Save icon saves your workflow

02:33

but not the zoomed out display as you can see here.

02:38

The Pan icon allows you to move the workflows position by dragging in the background.

02:43

Here we show what happens when you click an entity instead of clicking in the background.

02:49

Note that you do not have to highlight the workflow to be able to pan the workflow.

02:54

It works either highlighted or not.

02:57

The Sticky note icon enables you to create a note.

03:01

Enter the text in the text field

03:06

and then click out in the background to save.

03:11

And you can also move it by dragging and dropping.

03:15

Now we'll see how we can make modifications such as changing a state's name.

03:20

We do this by double clicking the state name and in this case changing the name from In Progress to Review In Progress.

03:31

Let's also enable the escalation for this state and set it to be escalated after five days by executing a transition of return

03:44

and to notify the owner by email on occurrence.

03:57

To modify a transition, double click the transition and make any changes to its properties and permissions

04:03

in the Transition Properties dialog.

04:08

Here's an example of the all tasks completed Transition Properties dialog.

04:16

To create a new state, click the State icon and click the location for the state.

04:22

Next enter a name, such as Canceled in this case, and to create a transition,

04:29

drag a line from the middle of a state to the new state and enter the transition name,

04:35

Cancel in this case, and any other properties actions and permissions.

Video transcript

00:03

The next step in the module's workflow is overview of workflows.

00:09

A workflow refers to a sequence of transitions that are performed to complete a process.

00:15

At any point within these transitions the workflow is at a certain state.

00:20

A workflow can be viewed under the Workflow tab of an item.

00:23

Shown here are the elements of a workflow for an approval process workflow.

00:28

Starting point, state, locked state and transition.

00:32

Typically transitions use a verb for the name.

00:36

Every transition in a workflow has a workflow permission associated with it.

00:41

To perform that transition, a user must have the permission associated with it.

00:49

The next step in this module's workflow is to define workflows using Workflow Editor.

00:57

You create a workflow by selecting Workflow Editor from the list of workspace configuration tools.

01:04

Shown here is a view of the Workflow Editor interface with the tools available for adding states,

01:10

notes and transitions as well as viewing tools.

01:13

Note that copy and paste can also be used to copy all or some of the workflows from other workspaces.

01:22

Next, a demonstration will introduce you to the Workflow Editor tools.

01:28

In this demonstration, we will create a workflow for the Design Reviews - Supplier workspace

01:35

by copying and pasting the workflow from the design reviews workspace.

01:39

Once that is done, we will edit the workflow using the Workflow Editor tools.

01:44

In the Workflow Editor of the Design Reviews workspace, we use Ctrl A to select the entire workflow

01:51

and then use the Copy icon in the Workflow Editor toolbar to copy it to the clipboard.

01:59

Then we expand the Design Reviews - Supplier workspace,

02:03

select Workflow Editor and this time, use the P aste icon to paste the workflow into the editor.

02:11

We can drag and drop items to move them into place as shown here.

02:15

Now we'll explore some of the other tools and the workflow editors, such as the Fit to window icon

02:21

to fit the workflow in the window and then the Zoom out and in icons.

02:30

The Save icon saves your workflow

02:33

but not the zoomed out display as you can see here.

02:38

The Pan icon allows you to move the workflows position by dragging in the background.

02:43

Here we show what happens when you click an entity instead of clicking in the background.

02:49

Note that you do not have to highlight the workflow to be able to pan the workflow.

02:54

It works either highlighted or not.

02:57

The Sticky note icon enables you to create a note.

03:01

Enter the text in the text field

03:06

and then click out in the background to save.

03:11

And you can also move it by dragging and dropping.

03:15

Now we'll see how we can make modifications such as changing a state's name.

03:20

We do this by double clicking the state name and in this case changing the name from In Progress to Review In Progress.

03:31

Let's also enable the escalation for this state and set it to be escalated after five days by executing a transition of return

03:44

and to notify the owner by email on occurrence.

03:57

To modify a transition, double click the transition and make any changes to its properties and permissions

04:03

in the Transition Properties dialog.

04:08

Here's an example of the all tasks completed Transition Properties dialog.

04:16

To create a new state, click the State icon and click the location for the state.

04:22

Next enter a name, such as Canceled in this case, and to create a transition,

04:29

drag a line from the middle of a state to the new state and enter the transition name,

04:35

Cancel in this case, and any other properties actions and permissions.

Create a Workflow Using Workflow Editor - Exercise

In this exercise, you will create a workflow for the Design Reviews - Supplier workspace by copying and pasting the workflow from the Design Reviews workspace. Once that is done, you will edit the workflow using the Workflow Editor tools. 

Task 1: Copy and Paste a Workflow 

  1. In the navigation menu, select Administration > Workspace Manager
  2. Expand the Design Reviews workspace and select Workflow Editor
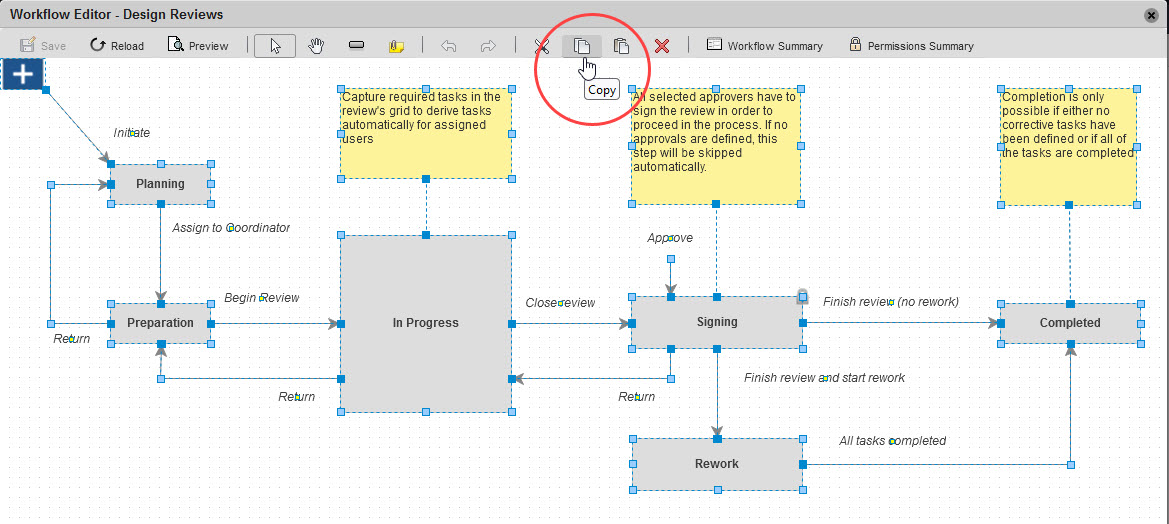
  3. In the Workflow Editor, press <Ctrl>+<A> to select the entire workflow, then click the Copy icon in the Workflow Editor toolbar to copy the workflow to the clipboard.


  4. Click the X in the top-right corner to close the Design Reviews Workflow Editor. 
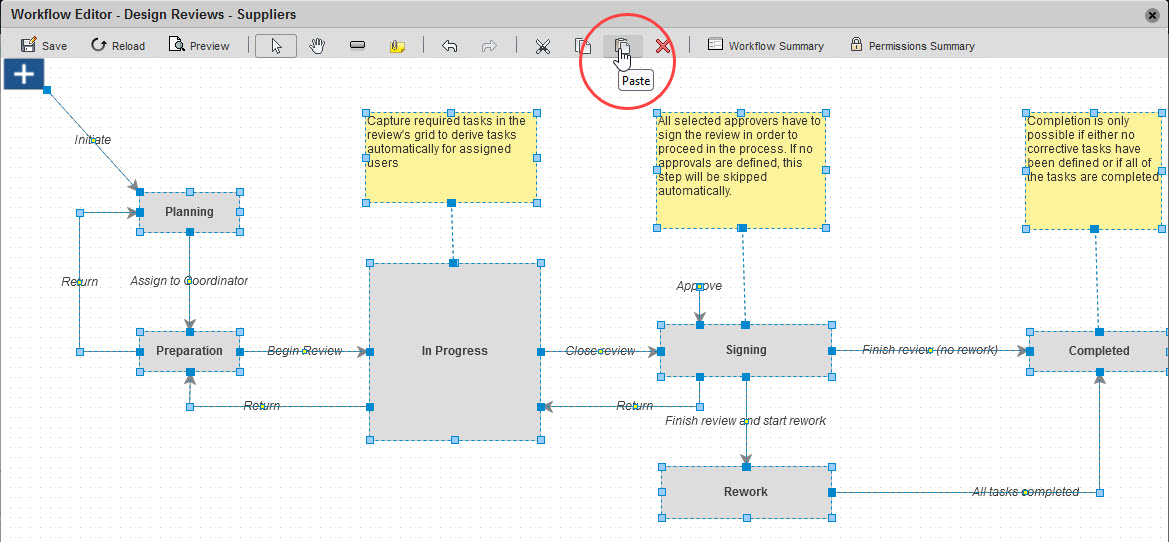
  5. In the Workspace Manager, expand the Design Reviews - Suppliers workspace and select Workflow Editor
  6. In the Workflow Editor, click the Paste icon to paste the workflow into the editor.

Task 2: Explore the Tools in the Workflow Editor 

In this task, you will explore the tools available in the Workflow Editor. 

  1. Remain in the Design Reviews – Suppliers Workflow Editor. You can drag and drop items to move them into place, as required. 
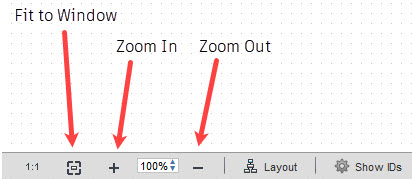
  2. Use the Zoom In and Zoom Out icons at the bottom of the window to adjust the size of the workflow in the window.  
  3. Click the Fit to Window icon to fit the workflow in the window.


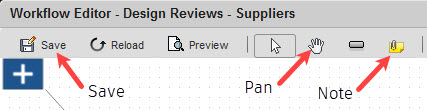
  4. Click Save to save your workflow (but note that this does not save the zoom setting for your display).  
  5. Select the Pan icon and move the workflow’s position by clicking and dragging in the background.  
    • Hint: Be sure to click the background and not an entity in the workflow. Clicking an entity selects that entity rather than allowing you to pan. Note that you do not have to highlight the workflow to be able to pan the workflow. It works either highlighted or not. 
  6. Click the Note icon, then click to place a sticky note in the workflow. In the Note Properties window, enter the required text in the Text field, then click out in the workflow background to save.

Task 3: Modify States and Transitions  

In this task, you will modify existing state names and transitions. 

  1. Still in the Workflow Editor for the Design Reviews – Suppliers workspace, double-click on the In Progress state’s name. 
  2. In the State Properties window, change the Name to Review in Progress.


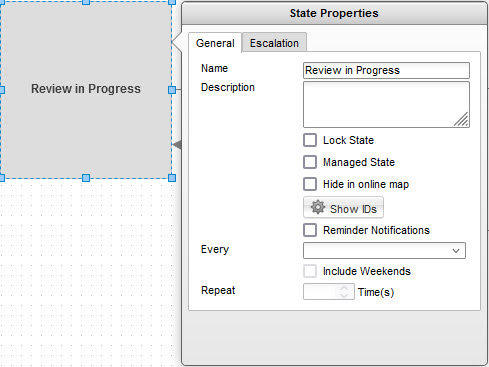
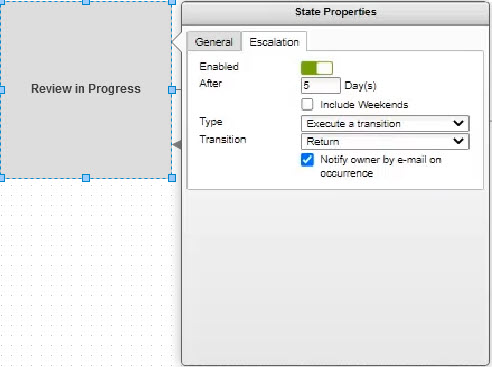
  3. Select the Escalation tab. Click the button next to Enabled to enable the escalation for this state, then set the following: 
    • After: 5 Days 
    • Type: Execute a transition 
    • Transition: Return  
    • Select Notify owner by e-mail on occurrence


  4. Click in the background of the workflow to save the State Properties changes.

Task 4: Create a State and Transition

In this task, you will create a new state and transition for the workflow. 

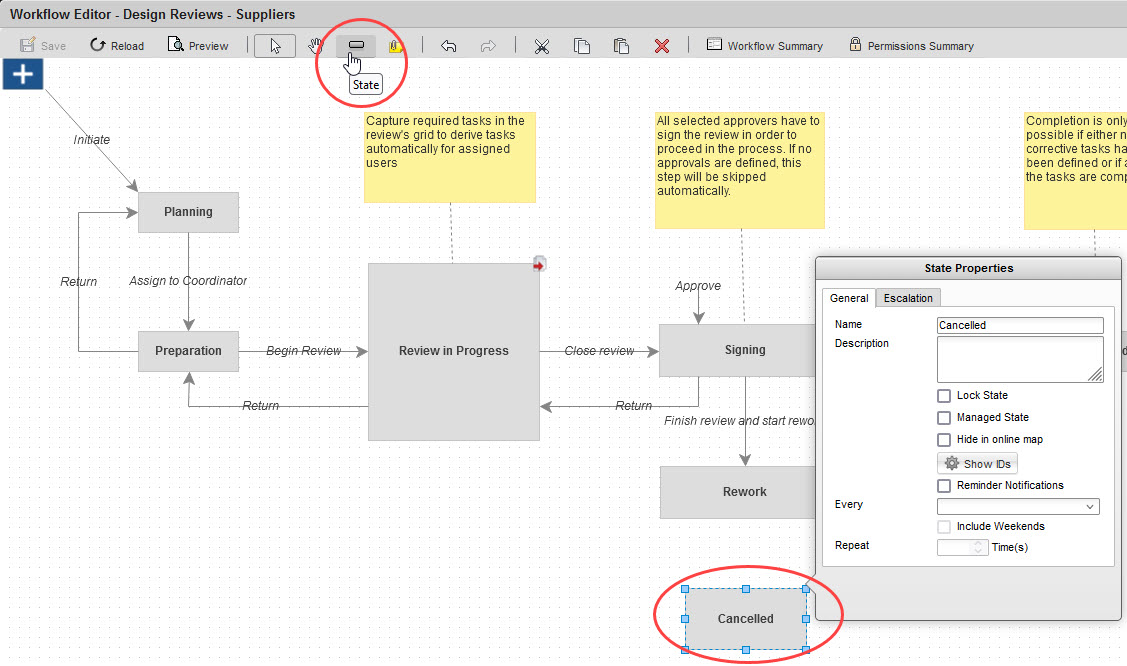
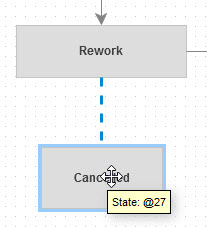
  1. To create a new state, click the State icon and click in the workflow to place the state. 
  2. In the State Properties window, enter Cancelled for the Name. Click in the background of the workflow to save.


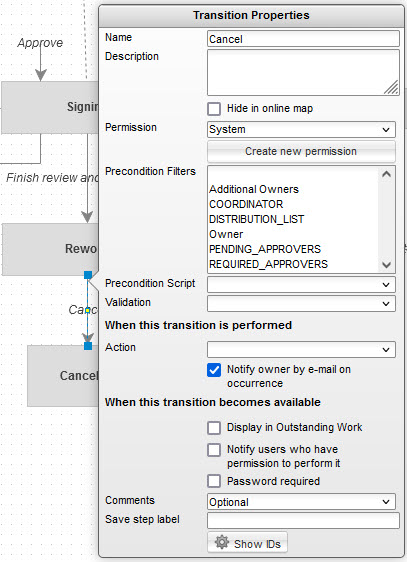
  3. To create a transition, drag a line from the middle of the Rework state to the new Cancelled state.


  4. In the Transition Properties window, set the following: 
    • Name: Cancel 
    • Permission: System 
    • Enable Notify owner by e-mail on occurrence
  5. Click in the background of the workflow to save.

Was this information helpful?