Setting zoom levels for background layers

00:04

Once a background layer is imported into a model in info

00:07

works WS pro it can be automatically toggled on or off

00:11

based on zoom level range for easy review and enhanced performance

00:16

to start open session two bridge net GEO plan

00:19

toggle polygons off and import the shape file background dot SHH

00:24

P.

00:26

Apply the shape file to the GEO plan and style it appropriately.

00:30

You can then configure the background layers zoom levels.

00:34

The GEO plan's current zoom level appears on the status bar as the first value and

00:39

displays the distance across or the distance between

00:42

the two closest opposite sides of the GEO plan

00:46

to set the zoom level range for your background layer to appear

00:50

on the GEO plan,

00:51

right? Click

00:52

and from the shortcut menu select layer control,

00:56

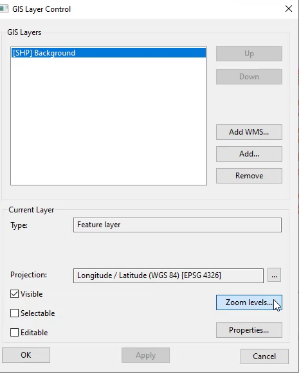
this displays the GIS layer control dialogue

01:00

under GIS

01:01

layers select the imported background shape file.

01:05

Then from the current layer group click zoom levels.

01:09

This opens the layer visibility dialogue

01:13

by default, the option show layer at all zoom levels is selected

01:18

to specify the level range over which the background layer is to be applied.

01:22

Select show layer between these zoom levels

01:25

for now leave the minimum zoom set to zero and in the max zoom field enter 2000

01:32

click. OK.

01:35

Back in the GIS layer control dialogue click apply

01:39

now zoom in and out of the GEO plan and notice how

01:43

the background layer toggles on and off automatically based on the zoom level

01:48

setting zoom levels on background layers provides an efficient review

01:51

of model data as layers toggle on and off automatically.

Video transcript

00:04

Once a background layer is imported into a model in info

00:07

works WS pro it can be automatically toggled on or off

00:11

based on zoom level range for easy review and enhanced performance

00:16

to start open session two bridge net GEO plan

00:19

toggle polygons off and import the shape file background dot SHH

00:24

P.

00:26

Apply the shape file to the GEO plan and style it appropriately.

00:30

You can then configure the background layers zoom levels.

00:34

The GEO plan's current zoom level appears on the status bar as the first value and

00:39

displays the distance across or the distance between

00:42

the two closest opposite sides of the GEO plan

00:46

to set the zoom level range for your background layer to appear

00:50

on the GEO plan,

00:51

right? Click

00:52

and from the shortcut menu select layer control,

00:56

this displays the GIS layer control dialogue

01:00

under GIS

01:01

layers select the imported background shape file.

01:05

Then from the current layer group click zoom levels.

01:09

This opens the layer visibility dialogue

01:13

by default, the option show layer at all zoom levels is selected

01:18

to specify the level range over which the background layer is to be applied.

01:22

Select show layer between these zoom levels

01:25

for now leave the minimum zoom set to zero and in the max zoom field enter 2000

01:32

click. OK.

01:35

Back in the GIS layer control dialogue click apply

01:39

now zoom in and out of the GEO plan and notice how

01:43

the background layer toggles on and off automatically based on the zoom level

01:48

setting zoom levels on background layers provides an efficient review

01:51

of model data as layers toggle on and off automatically.

Video quiz

Setting a zoom level range for a background layer allows for which of the following?

(Select one)
Select an answer

1/1 questions left unanswered

Step-by-step Guide

Once a background layer is imported into a model in InfoWorks WS Pro, it can be automatically toggled on or off based on zoom level range for easy review and enhanced performance.

  1. From the Model Group, drag BridgeNet and drop it into the workspace to open the GeoPlan.
  2. In the GeoPlan Properties and Themes dialog box, Polygons row, disable Display.
  3. Import Background.shp.
  4. Apply the shapefile to the GeoPlan, and style it appropriately.

In the GeoPlan, notice the status bar displays the current zoom level. To set the zoom level range at which your background appears:
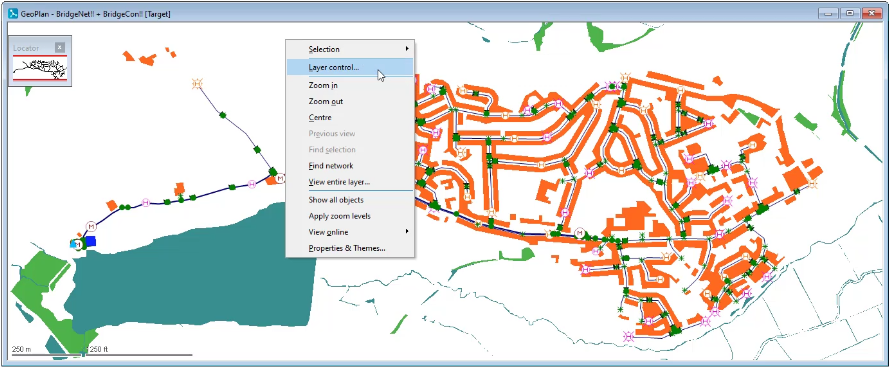
  1. In the GeoPlan, right-click and select Layer Control.

  1. In the GIS Layer Control dialog box, under GIS Layers, select the imported Background shapefile.
  2. From the Current Layer group box, click Zoom levels.

To specify the level range over which the background layer is to be applied:

  1. In the Layer Visibility dialog box, select Show layer between these zoom levels.
  2. Leave the Min Zoom (m) set to 0.
  3. In the Max Zoom (m) field, enter “2000”.
  4. Click OK.

  1. In the GIS Layer Control dialog box, click Apply.
  2. Zoom in and out of the GeoPlan.

Notice the background layer toggles on and off based on the zoom level.

Was this information helpful?