Rooms

00:07

NARRATOR: Before you can add room tags

00:09

to label the spaces in your model,

00:11

you must add room elements.

00:13

Adding room elements is as simple as clicking

00:15

within an enclosed space.

00:18

The rooms will number automatically

00:19

as they're placed, and they typically

00:22

include a room tag by default.

00:24

On the Architecture tab on the Room and Area panel,

00:27

we have a Room button right here.

00:29

I'll click that button, and you'll

00:31

see that the Tag on Placement feature is already enabled,

00:35

and that means that I'll get both a room and a room tag

00:39

with a single click.

00:40

Now, if I move my mouse outside of the floor plan,

00:43

you'll get this generically shaped blue rectangle, which

00:46

represents the room, and it'll have this X running through it.

00:51

That would create a non-enclosed room.

00:54

But if you move your mouse within the plan,

00:57

notice that the shape of that blue outline and the X

01:00

is now conforming to the enclosed space in which

01:05

your mouse is contained.

01:07

And I'll click to place my first room element.

01:10

Now, I'll move my mouse away from that slightly,

01:12

and you'll see that the room I just placed

01:15

will have this blue tinted color,

01:17

and it'll have this X running through that.

01:19

Both of those are indications that we now

01:21

have a room element there.

01:22

Now, what I want to do is actually cancel the command.

01:25

I'll click the Modify tool to get out.

01:27

And the main reason is that the first room that I placed

01:30

came in his room number one.

01:32

Now, if you're satisfied with that number,

01:34

you can certainly continue, but I

01:36

want to actually change that number,

01:37

and it's a really good idea to do

01:39

that first so that I won't have to do

01:42

lots of renumbering later.

01:43

So let's move our mouse over here and locate that X again.

01:47

And there's two ways that we can change the values

01:50

within the room.

01:50

One is to actually select the room itself.

01:53

So all you have to do is locate that X and click,

01:56

and that will select the room element.

01:59

We can then move over here to the Properties palette,

02:01

and you'll see its number and its name listed right here.

02:05

So let's take the number and change that to 101, press

02:09

Enter, and then I'll apply that by moving my mouse back

02:12

into the floor plan.

02:13

Notice that the tag will update immediately

02:16

to reflect that change.

02:17

The name is still called Room, and I'd

02:20

like to change that too.

02:22

So I could do that right in the Properties palette the same way

02:24

or, alternatively, I could come over here and select the Room

02:28

tag instead.

02:30

Now, that will indicate which room is its host because it

02:34

will highlight its host room in a reddish color,

02:37

and then the labels within the room tag

02:39

will now become editable.

02:41

So I can click right on the word "Room"

02:43

and type in my preferred value, such as "Exam Room."

02:47

Now, to show you what that did, I'm

02:49

going to locate that X again, click it, and come

02:53

back over here to the Properties palette.

02:55

And notice that it changed the value of the actual room.

02:58

So it doesn't really matter whether or not

02:60

you select the room and edit it in properties or whether you

03:03

do it through the tag.

03:04

The result is going to be the same either way.

03:07

You're changing the values within the host room element,

03:10

and the tag is simply updating to reflect that change.

03:13

All right, let's continue now with the next room.

03:16

So we'll go back to the Room command, or type RM,

03:18

the keyboard shortcut.

03:20

And let's move over to the next space to the right

03:23

and click to place it.

03:24

Now, notice that the number automatically

03:26

incremented to 102.

03:28

So that's why it was so important for us

03:30

to get the number of the first room correct

03:33

so that it would then number sequentially from that point

03:36

on.

03:36

But look at the name.

03:37

Notice how it went back to that default name

03:40

that we had a moment ago.

03:41

Well, that's as simple as coming over here to the Properties

03:44

palette and changing the name that you want first

03:48

on the Properties palette.

03:49

And that effectively establishes Exam Room, now,

03:52

as the new default name.

03:54

And I could make Exam Room

03:60

and so on.

04:01

Now, if you need to change the room name,

04:03

you'll just need to remember to come back over

04:05

to Properties palette and change that before you continue.

04:09

So I'll create a corridor next, and I'm

04:13

going to place that right below my exam rooms here.

04:16

And notice that that flows out in into this large open space.

04:21

Let's say you wanted to subdivide that large space

04:24

into smaller areas.

04:26

Let's go ahead and click the Modify tool to cancel out

04:30

of the Room command and look at how

04:33

we can begin to subdivide this large corridor space.

04:36

On the Architecture tab, there's a Room Separator.

04:39

This gives you access to several drawing tools,

04:43

and these are just lines that you

04:45

can use to divide up spaces.

04:47

So let's say that this space up here I wanted

04:50

to make into a small vestibule.

04:51

I can simply draw a line across the boundary

04:55

that I want to create there, click my Modify tool,

04:59

locate my corridor space, which might be a little tricky to get

05:03

over here by the tag, but I'll move down right about here

05:07

and locate that X that passes through the space.

05:12

And notice when I select it this time

05:13

that it no longer includes that small vestibule

05:15

space near the top.

05:17

So I could go to the Architecture tab

05:19

and click my Room button again and create a new room up

05:24

in that location.

05:26

And then I'll click the Modify tool to cancel.

05:28

Now, it still is called Corridor because that's

05:31

what we had set the default to.

05:33

And if you want to call it something else like Vestibule,

05:35

you can simply rename it.

05:37

So at this point you could continue

05:39

adding all of the remaining rooms that

05:41

are required by this plan.

05:43

And when you're done, it might look something like this.

Video transcript

00:07

NARRATOR: Before you can add room tags

00:09

to label the spaces in your model,

00:11

you must add room elements.

00:13

Adding room elements is as simple as clicking

00:15

within an enclosed space.

00:18

The rooms will number automatically

00:19

as they're placed, and they typically

00:22

include a room tag by default.

00:24

On the Architecture tab on the Room and Area panel,

00:27

we have a Room button right here.

00:29

I'll click that button, and you'll

00:31

see that the Tag on Placement feature is already enabled,

00:35

and that means that I'll get both a room and a room tag

00:39

with a single click.

00:40

Now, if I move my mouse outside of the floor plan,

00:43

you'll get this generically shaped blue rectangle, which

00:46

represents the room, and it'll have this X running through it.

00:51

That would create a non-enclosed room.

00:54

But if you move your mouse within the plan,

00:57

notice that the shape of that blue outline and the X

01:00

is now conforming to the enclosed space in which

01:05

your mouse is contained.

01:07

And I'll click to place my first room element.

01:10

Now, I'll move my mouse away from that slightly,

01:12

and you'll see that the room I just placed

01:15

will have this blue tinted color,

01:17

and it'll have this X running through that.

01:19

Both of those are indications that we now

01:21

have a room element there.

01:22

Now, what I want to do is actually cancel the command.

01:25

I'll click the Modify tool to get out.

01:27

And the main reason is that the first room that I placed

01:30

came in his room number one.

01:32

Now, if you're satisfied with that number,

01:34

you can certainly continue, but I

01:36

want to actually change that number,

01:37

and it's a really good idea to do

01:39

that first so that I won't have to do

01:42

lots of renumbering later.

01:43

So let's move our mouse over here and locate that X again.

01:47

And there's two ways that we can change the values

01:50

within the room.

01:50

One is to actually select the room itself.

01:53

So all you have to do is locate that X and click,

01:56

and that will select the room element.

01:59

We can then move over here to the Properties palette,

02:01

and you'll see its number and its name listed right here.

02:05

So let's take the number and change that to 101, press

02:09

Enter, and then I'll apply that by moving my mouse back

02:12

into the floor plan.

02:13

Notice that the tag will update immediately

02:16

to reflect that change.

02:17

The name is still called Room, and I'd

02:20

like to change that too.

02:22

So I could do that right in the Properties palette the same way

02:24

or, alternatively, I could come over here and select the Room

02:28

tag instead.

02:30

Now, that will indicate which room is its host because it

02:34

will highlight its host room in a reddish color,

02:37

and then the labels within the room tag

02:39

will now become editable.

02:41

So I can click right on the word "Room"

02:43

and type in my preferred value, such as "Exam Room."

02:47

Now, to show you what that did, I'm

02:49

going to locate that X again, click it, and come

02:53

back over here to the Properties palette.

02:55

And notice that it changed the value of the actual room.

02:58

So it doesn't really matter whether or not

02:60

you select the room and edit it in properties or whether you

03:03

do it through the tag.

03:04

The result is going to be the same either way.

03:07

You're changing the values within the host room element,

03:10

and the tag is simply updating to reflect that change.

03:13

All right, let's continue now with the next room.

03:16

So we'll go back to the Room command, or type RM,

03:18

the keyboard shortcut.

03:20

And let's move over to the next space to the right

03:23

and click to place it.

03:24

Now, notice that the number automatically

03:26

incremented to 102.

03:28

So that's why it was so important for us

03:30

to get the number of the first room correct

03:33

so that it would then number sequentially from that point

03:36

on.

03:36

But look at the name.

03:37

Notice how it went back to that default name

03:40

that we had a moment ago.

03:41

Well, that's as simple as coming over here to the Properties

03:44

palette and changing the name that you want first

03:48

on the Properties palette.

03:49

And that effectively establishes Exam Room, now,

03:52

as the new default name.

03:54

And I could make Exam Room

03:60

and so on.

04:01

Now, if you need to change the room name,

04:03

you'll just need to remember to come back over

04:05

to Properties palette and change that before you continue.

04:09

So I'll create a corridor next, and I'm

04:13

going to place that right below my exam rooms here.

04:16

And notice that that flows out in into this large open space.

04:21

Let's say you wanted to subdivide that large space

04:24

into smaller areas.

04:26

Let's go ahead and click the Modify tool to cancel out

04:30

of the Room command and look at how

04:33

we can begin to subdivide this large corridor space.

04:36

On the Architecture tab, there's a Room Separator.

04:39

This gives you access to several drawing tools,

04:43

and these are just lines that you

04:45

can use to divide up spaces.

04:47

So let's say that this space up here I wanted

04:50

to make into a small vestibule.

04:51

I can simply draw a line across the boundary

04:55

that I want to create there, click my Modify tool,

04:59

locate my corridor space, which might be a little tricky to get

05:03

over here by the tag, but I'll move down right about here

05:07

and locate that X that passes through the space.

05:12

And notice when I select it this time

05:13

that it no longer includes that small vestibule

05:15

space near the top.

05:17

So I could go to the Architecture tab

05:19

and click my Room button again and create a new room up

05:24

in that location.

05:26

And then I'll click the Modify tool to cancel.

05:28

Now, it still is called Corridor because that's

05:31

what we had set the default to.

05:33

And if you want to call it something else like Vestibule,

05:35

you can simply rename it.

05:37

So at this point you could continue

05:39

adding all of the remaining rooms that

05:41

are required by this plan.

05:43

And when you're done, it might look something like this.

Exercise 1–Rooms and Room Tags

Before you can add room tags to label the spaces in your model, you must add Room elements. Adding room elements is as simple as clicking within an enclosed space. Rooms will number automatically as they are placed.

Catch-up file completed to this point: 15_Medical Center_Rooms.rvt

Adding Rooms

Let’s start by adding a room and tag to the plan.

  1. In the Level 1 floor plan, zoom in on the central area of the plan.
  2. On the Architecture tab, on the Room and Area panel, click the Room button.
  3. Click anywhere inside the Exam room near Grid D6 (see Figure 15–1).


Figure 15–1 Add the first room

  1. Click the Modify tool or esc twice to cancel the command.

Edit a Room

The room will disappear. Rooms are invisible when not selected. If you move your pointer around within the space, you will see a cross through the space highlight as you get near. You can click this to select the room and edit it.

  1. Select the room we just placed.
  2. On the Properties palette, locate the Number property and change it to: 101.
  3. Locate the Name property and change it to: Exam Room (see Figure 15–2).

Notice that the Room Tag will update with the new information!

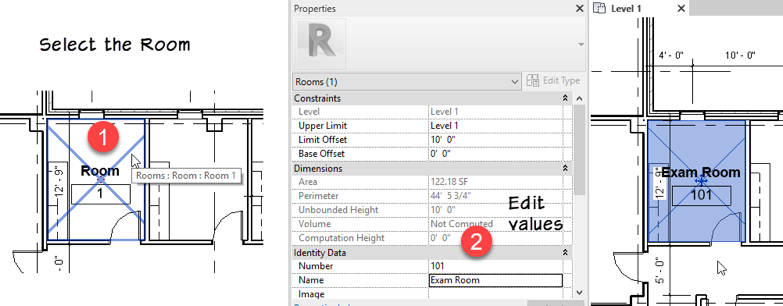
Figure 15–2 Select a room and edit its properties - the Room Tag will update

  1. Run the Room tool again and click in the next exam room space (see Figure 15–3).

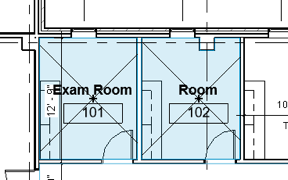
Figure 15–3 The numbers will automatically increment sequentially

Notice that the number automatically increments to; 102. The Name will not match however. But if you input a value on Properties before you click, it will use that name.

  1. On the Properties palette, click in the Name Field and type: Exam Room.
  2. Click in the next space to place a room.

It will be Exam Room, number 103.

  1. Place the next two (see Figure 15–4).


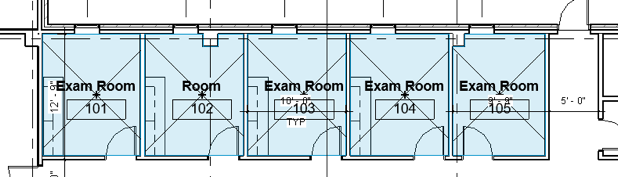
Figure 15–4 Place more exam rooms after presetting the value on the Properties palette

  1. Click below the exam rooms in the corridor to place one more room. Then press esc twice.

Room Placement Strategy

The number continues to sequence nicely, but as you can see, the corridor is still using the Exam Room name. If you remember this, you can plan ahead before you click and change the name on the Properties palette each time you need to change room names. Alternatively, you can edit the name later either by selected the room and using the Properties palette as we did previously, or you can use the Room Tag itself as a shortcut.

  1. Select the corridor room tag (currently showing Exam Room).

The associated room will highlight in a red color.

  1. Pause briefly and then click again directly on the Room Name.

If you do this too quickly, Revit could read this as a double-click and you might find you are in the family editor, editing the room tag family. If this happens, clock the tag and try again.

  1. Edit the room name to: Corridor and press enter to finish (see Figure 15–5).

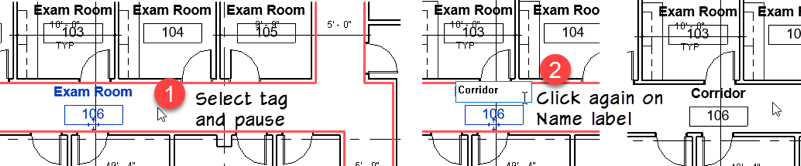
Figure 15–5 Edit room properties directly from the tag

  1. Continue adding rooms for the remaining spaces (see Figure 15–6).

Figure 156 Add the remaining rooms and tags

Was this information helpful?